Virtual machines cost money when they’re powered on. Most servers obviously need to be on 24 hours a day. Others, like development machines, only have to be on when you’re using them. And if you forget to turn them off, they’ll empty out your Azure credits (or your credit card) before you know it.
Today, I’ll show you how to set an Auto-shutdown time to turn a VM off if you forget, as well as have Azure notify you on Slack 30 minutes ahead of time, so you have the option to postpone or cancel the shutdown.
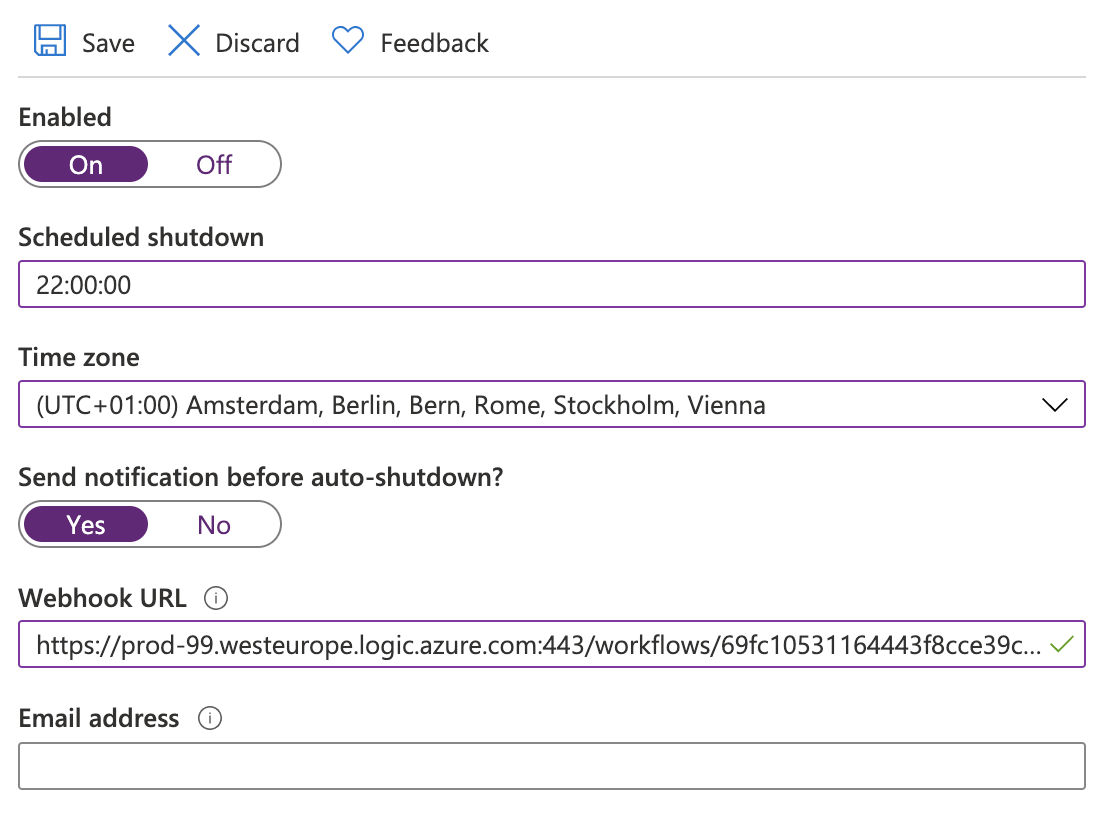
Setting the Auto-shutdown option
Open up the property page of the VM in the Azure Portal, then click on the Auto-shutdown tab.
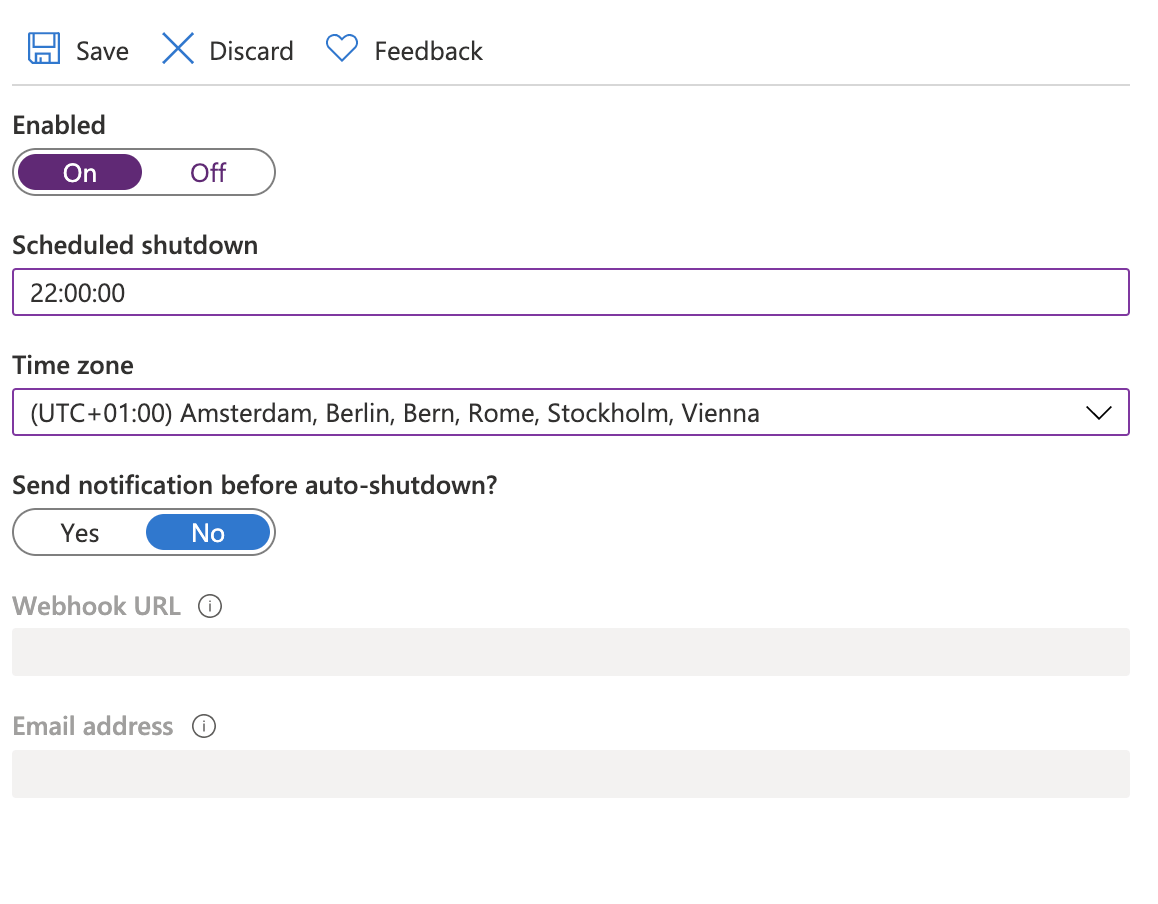
To enable auto-shutdown, just toggle the “Enabled” switch to the “On” position and set a scheduled shutdown time that suits you.
Set a notification
Having your dev environment shutting down without warning when you’re in the middle of a deploy script can be a nasty surprise, so I would strongly urge you to set a notification. The easiest option here is to just enter one or more email addresses, delimited by semicolons.
If the VM is still running, you’ll get an email 30 minutes before the scheduled shutdown time, with links that allow you to postpone shutdown by one hour, two hours, or skip shutdown entirely.
Here’s the thing, though. I often miss those e-mail notifications, because I’m not regularly checking my inbox while I’m working. So the other day, I set out to send those notifications directly into a Slack channel, so it would instantly pop up on my phone as a notification.
Use a webhook to send a Slack notification
For this post, I’m using Microsoft Flow Microsoft Power Automate, but the idea is the same, even if you’re using a different type of integration automation tool, like ITTT, Zapier, Automate.io, or Workato – as long as it can respond to an incoming webhook.
If you’re new to this type of automation, shop around some – connectors can often be included as standard on one platform and premium on another!
Create a new flow
- Choose an “Instant flow”.
- Name the flow something clever that you’ll remember three years from now, when you’re troubleshooting this.
- Select “When an HTTP request is received”. We’re going to trigger the flow using a webhook, which is an HTTP request.
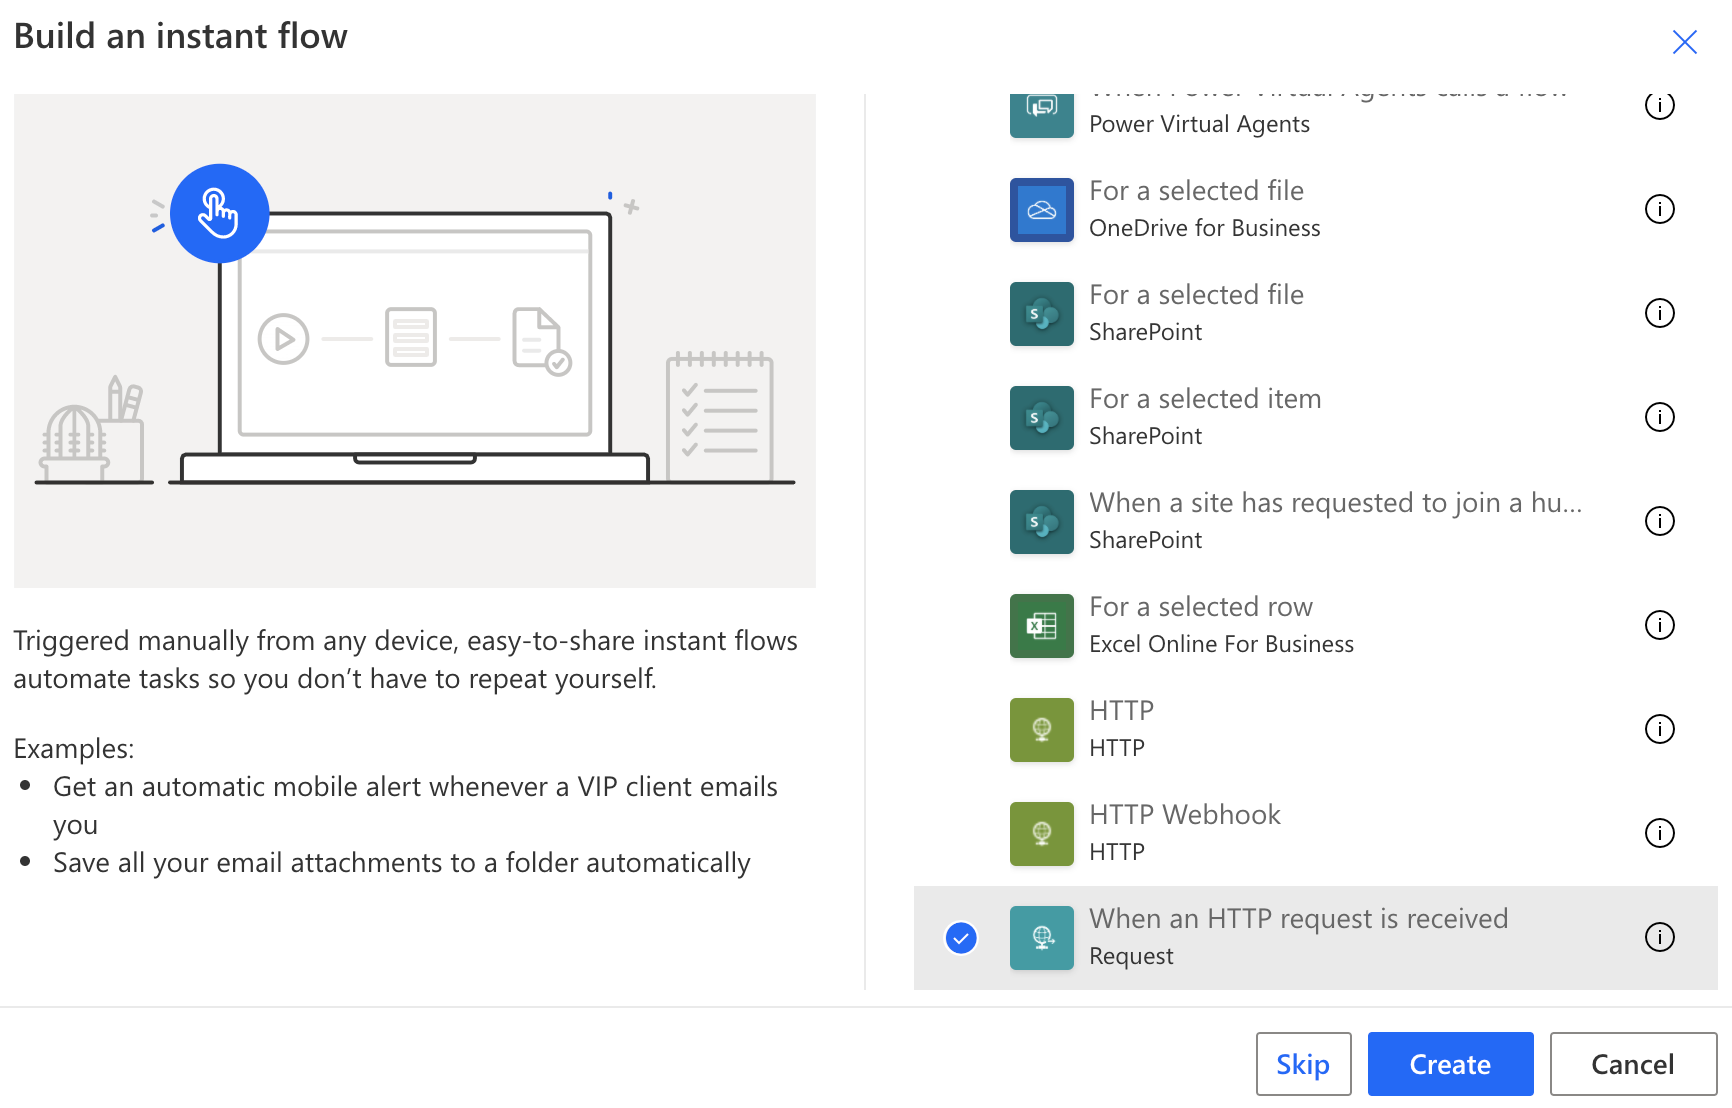
- Select “Create” to proceed.
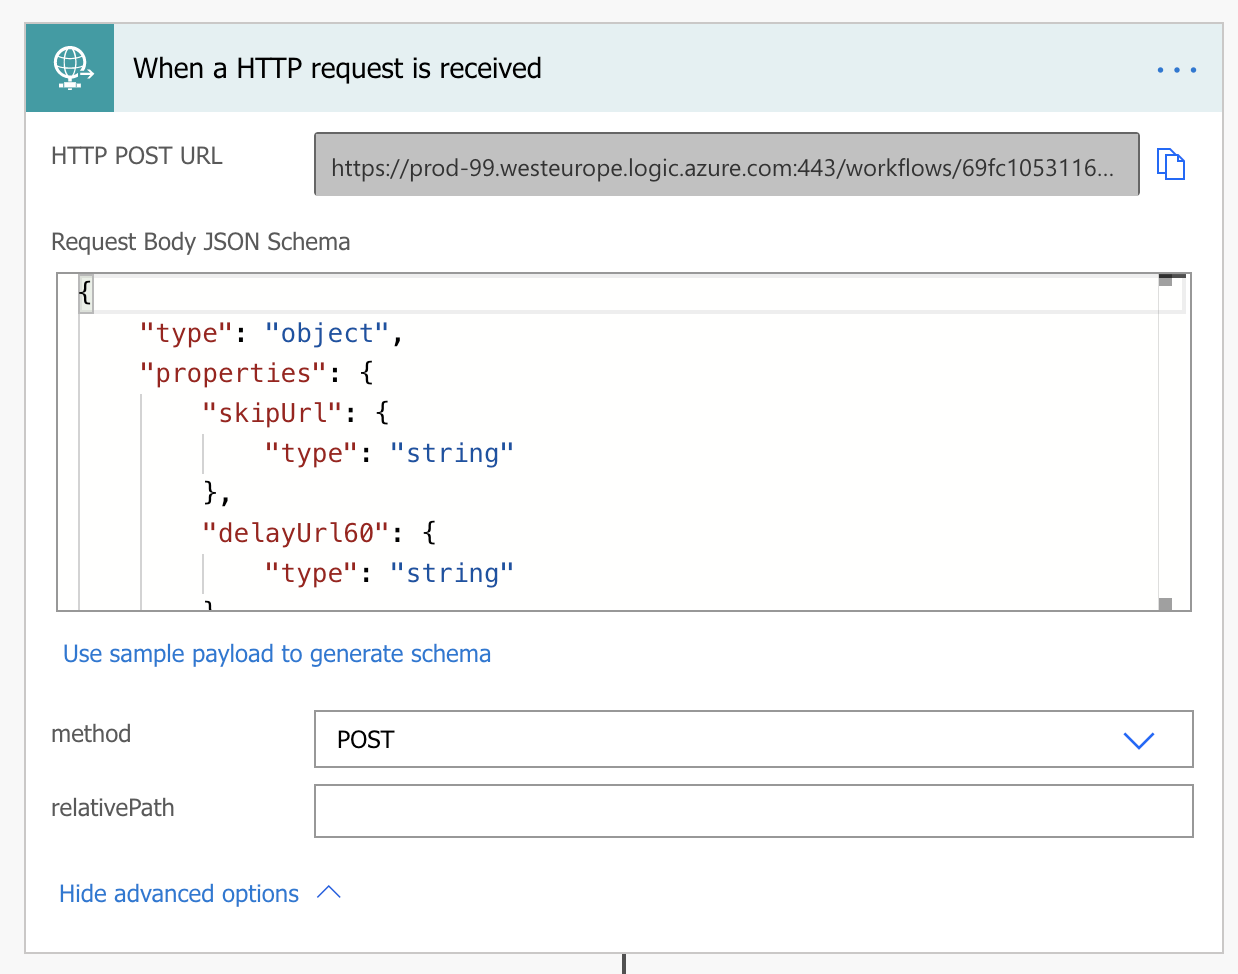
Configure the HTTP request
- Click on the green HTTP request box to expand it.
- Copy and paste in the following request body JSON schema:
{
    "type": "object",
    "properties": {
        "skipUrl": {
            "type": "string"
        },
        "delayUrl60": {
            "type": "string"
        },
        "delayUrl120": {
            "type": "string"
        },
        "vmName": {
            "type": "string"
        },
        "guid": {
            "type": "string"
        },
        "owner": {},
        "vmUrl": {
            "type": "string"
        },
        "minutesUntilShutdown": {
            "type": "string"
        },
        "eventType": {
            "type": "string"
        },
        "text": {
            "type": "string"
        },
        "subscriptionId": {
            "type": "string"
        },
        "resourceGroupName": {
            "type": "string"
        },
        "labName": {}
    }
}
- Select POST as the method (you may have to expand “advanced options”).
Once you’re done, click “+ New step” to connect an action that will send the notification to Slack.
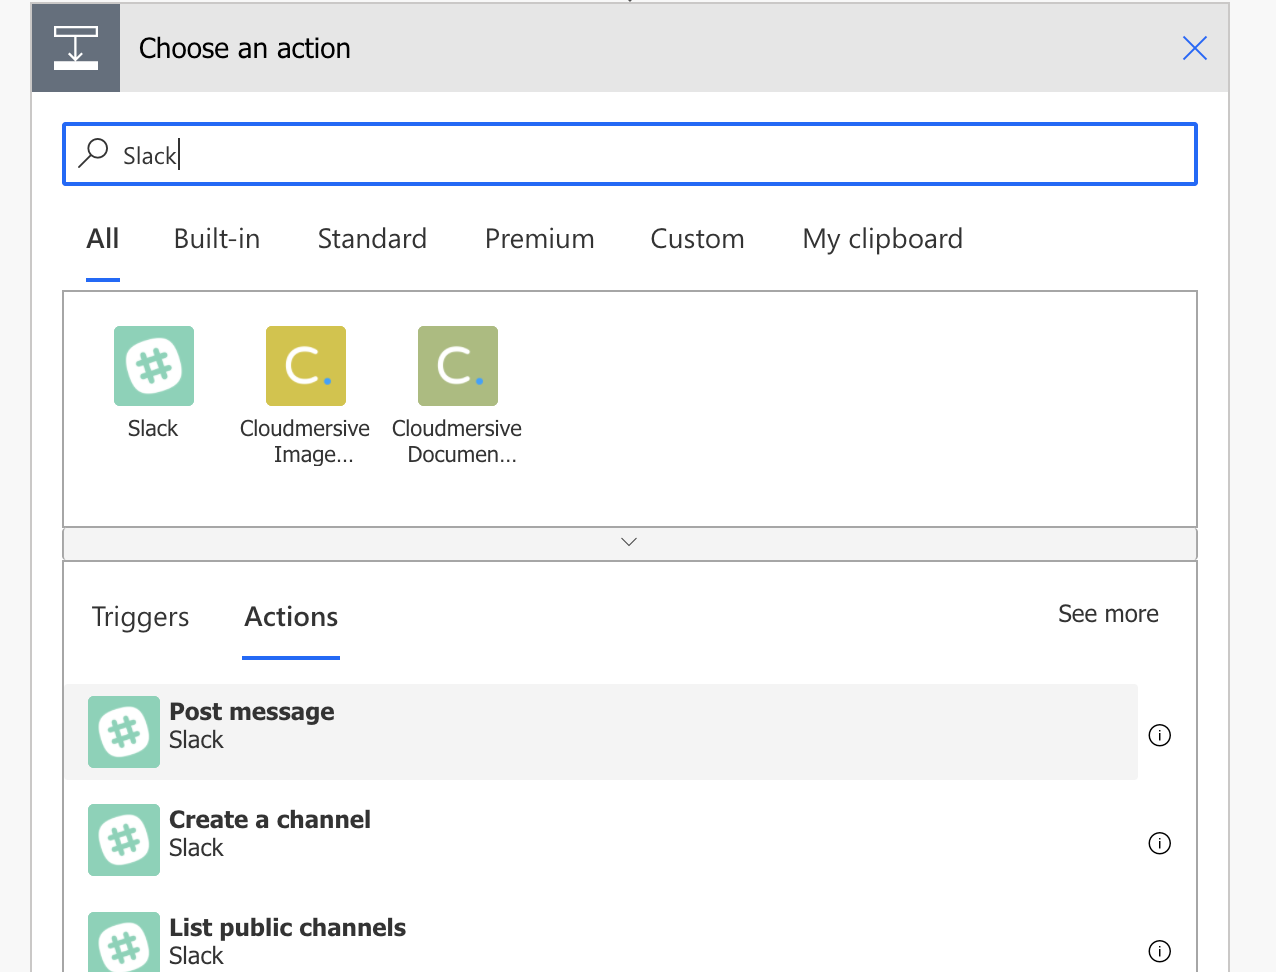
Configure the Slack connector
At some point in this process, Power Automate will ask you to authenticate to Slack. I’ve already done this previously, so I can’t show you here what it looks like.
- Type “Slack” in the search box and click on the “Post message” action:
- Choose the channel name where you want to post the notification. If you want a private message, prefix your Slack username with an @ sign. If you’re sharing the VM with a dev team, you may want to notify that entire team in an appropriate channel.
- Here’s an example of a message text block:
:warning: VM will auto-shutdown in @{triggerBody()?['minutesUntilShutdown']} minutes. You may delay shutdown by <@{triggerBody()?['delayUrl60']}|60 minutes>, <@{triggerBody()?['delayUrl120']}|120 minutes>, or <@{triggerBody()?['skipUrl']}|skip auto-shutdown>.- You can paste the template into the “Message Text” field and modify it to your heart’s contents. Slack uses a variation of markdown, so you can introduce all manner of formatting and stuff to your message.
- Optionally, expand the advanced options.
- I’m using the VM name as the name of the bot sending the message. That way, the message will look like it’s coming from that VM in Slack.
@{triggerBody()?['vmName']}- You can also set up things like an emoji for the bot if you want.
Set up the webhook on the VM.
Once you’ve successfully saved your flow, check back on your HTTP connector – it will now contain the incoming webhook URL at the top:
- Copy the webhook URL.
- Before you leave, click the “Test” button in the top-right corner.

- Select “I’ll perform the trigger action” and click “Test”. Your flow will now await an incoming webhook from Azure.
- Going back to the Azure Portal and the VM’s property page, paste that URL into the “Webhook URL” field, after enabling notifications.
Trying it out
To test if everything is working, just set the auto-shutdown time to about 32 minutes from now and wait.
If other people are using the VM, make sure you also send an email to yourself, so you can cancel the shutdown if you don’t get the Slack notification.
Et voilà:

1 comment