Encrypting your SQL Server’s TDS connections should be high on your list of things to do if you’re concerned with the privacy of your data. This often boils down to one big problem: can you get a valid certificate without paying a ton of money, and will it work with SQL Server?
So follow me down the rabbit hole, as we work out the steps to using Let’s Encrypt to create (and auto-renew!) a certificate for SQL Server. This is going to get technical.
The premise for this post
Based on a real-world scenario I encountered recently, here is the premise for this post. I’m putting it here at the top, so I won’t have to expand my post into a gazillion permutations for all imaginable types of scenarios and situations. However, I think you’ll be able to adapt the workflow to your particular setup.
- SQL Server is running on an Azure VM with a connection to the Internet.
- Stand-alone SQL Server – no clustering, no availability groups.
- SQL Server has its own service account.
- No web server installed on the machine.
- I don’t have an Enterprise CA.
- I can’t/won’t install certificates on my clients’ computers and servers.
Acknowledgements
This post by Jan Pieter Posthuma was the only write-up on the entire Internet that I could find on this subject, and it constitutes the very basis for my experiment. It goes without saying that I’ve borrowed and adapted a lot of his Powershell magic. Thanks!
Disclaimer
This is not a beginner’s guide. We’re going to open up ports in firewalls and make configuration changes, including setting permissions. It’s your responsibility to understand the security implications of everything you do.
Ways to get or create a certificate
There are a few ways to get a certificate:
Self-signed certificates
A self-signed certificate is a bit like taking a photo of yourself, printing your name on it and laminating it. It doesn’t really certify anything. For a self-signed certificate to work, the client will either have to explicitly trust the certificate when connecting, or you’d have to install the certificate as explicitly trusted on each client machine. None of these options would work for my purpose.
Enterprise CA
An Enterprise CA (certifying authority) can create and sign certificates, but I don’t have one, and even if I took the time to set one up, my client computers wouldn’t know about it, or trust it.
Paying for it
There are plenty of companies out there that will sell you server certificates. They’re reputable and they’ve been around for decades. Thing is, though, there’s no free lunch. A real, signed certificate will set you back anywhere from $50 to $500 per year.
If that isn’t a problem, and/or if you value your time accordingly, this is your stop – thanks for reading.
Let’s Encrypt
Let’s Encrypt started a few years ago as an industry collaboration to increase the adoption of HTTPS on the web. Backed by organizations like the Mozilla Foundation, Cisco, EFF, Google, Facebook, Automattic (WordPress) and others, Let’s Encrypt provides a programmatic, free way to request certificates.
The programmatic aspect is important: their certificates are only valid for 90 days at a time, so they have to be renewed frequently. This is by design, and most client apps and tools will do the renewal automatically for you.
As of November 2017, Let’s Encrypt had issued more than 100 million certificates, almost exclusively to implement HTTPS on web sites.
Setting up the network, firewall and NSG
The way I’m going to be requesting/renewing certificates requires the Let’s Encrypt server to make an inbound HTTP connection. For this purpose, we’re going to have to make a few configuration changes to our Azure environment and VM.
DNS name
You’ll need a public IP address, and the fully qualified DNS name of your server will need to map to the public IP address.
- If you’re using Azure’s default domain, {region}.cloudapp.azure.com, you can set the DNS name of your host on the public IP address, in the field “DNS name label”
- If you brought your own domain, this is a good time to set up the A record in the DNS so the fully qualified domain name points to your public IP address.
To verify your setup, try:
> nslookup {fully qualified name}
This should return your public IP address.
Server identity
Make sure the server name of your computer matches the DNS name. If you go to the System control panel, select the Computer Name tab, and click “Change…”, you can set the name of the server as well as the full domain (with the “More…” button).
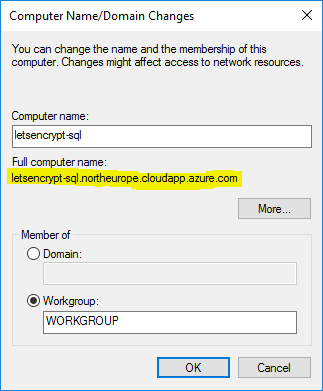
Verify that the full computer name matches the DNS lookup name. When you click OK, your server will probably prompt you to restart.
Opening up the firewall
The way I’m going about requesting a certificate, the Let’s Encrypt client tool will need the server to accept an incoming connection on port 80. You will very likely be able to request a certificate in another way, but if you’re following this tutorial, you’ll need to allow incoming connections on TCP port 80 in the Windows firewall.
- Inbound rules -> New rule…
- Port
- TCP
- Specific local ports: 80
- Allow the connection
Opening up the network security group
The network security group, if you have one, is similar to a firewall – it decides which connections are allowed and which ones are blocked. So, just like the Windows firewall, you’ll need to open up TCP port 80 for incoming connections in the network security group.
- Source: Any
- Source port range: *
- Destination: IP addresses
- Destination IP address range: the internal IP address of the server
- Destination port range: 80
- Protocol: TCP
- Action: Allow
Installing the client tool
Like Jan Pieter, I’m using letsencrypt-win-simple, which is a nifty client available from Github. Just download the most recent version, and extract the ZIP file in a convenient location. I put mine in C:\LetsEncrypt for the sake of simplicity.
While you’re at it, give the SQL Server service account full control of this folder (for later).
Requesting a certificate
The letsencrypt.exe runs interactively from a command prompt, allowing you to step through a series of options.
Before you perform a certificate request, make sure all the network settings are working – you can only request five (5) certificates for a given host name in a week!
Here’s roughly how it’ll look (you may want to modify some of these to suit your setup).
C:\LetsEncrypt>letsencrypt.exe
 [INFO] Let's Encrypt Windows Simple (LEWS)
 [INFO] Software version 1.9.7.10258 (RELEASE)
 [INFO] IIS not detected
 [INFO] ACME Server https://acme-v01.api.letsencrypt.org/
 [INFO] Please report issues at https://github.com/Lone-Coder/letsencrypt-win-simple

 N: Create new certificate
 L: List scheduled renewals
 R: Renew scheduled
 S: Renew specific
 A: Renew *all*
 C: Cancel scheduled renewal
 X: Cancel *all* scheduled renewals
 Q: Quit

Please choose from the menu: N
Choosing “N” starts the process of creating a new certificate.
 1: Single binding of an IIS site
 2: SAN certificate for all bindings of an IIS site
 3: SAN certificate for all bindings of multiple IIS sites
 4: Manually input host names
 C: Cancel

Which kind of certificate would you like to create?: 4
Option 4, “manually input host names”, allows you to enter all the host names you want included in the certificate, separated by commas:
Enter comma-separated list of host names, starting with the primary one: letsencrypt-sql.northeurope.cloudapp.azure.com

 1: [dns-01] Azure DNS
 2: [dns-01] Run external program/script to create and update records
 3: [http-01] Save file on local (network) path
 4: [http-01] Upload verification file to FTP(S) server
 5: [http-01] Self-host verification files (port 80 will be unavailable during validation)
 6: [http-01] Upload verification file to WebDav path

How would you like to validate this certificate?: 5
Here, I chose option number 5, given that I could open up port 80 for inbound traffic in the firewall, and that there was no other service using the port, like an existing web server.
If this doesn’t work for you, I would probably explore the other options, starting with DNS verification.
[INFO] Authorizing letsencrypt-sql.northeurope.cloudapp.azure.com using http-01 validation (SelfHosting)
[INFO] Answer should now be browsable at http://letsencrypt-sql.northeurope.cloudapp.azure.com/.well-known/acme-challenge/Q46tjdsMHI7*****************Fm5WpM
[INFO] Authorization result: valid
[INFO] Requesting certificate letsencrypt-sql.northeurope.cloudapp.azure.com 2017/11/21 9:45:56 PM
[INFO] Saving certificate to C:\ProgramData\letsencrypt-win-simple\httpsacme-v01.api.letsencrypt.org
[INFO] Installing certificate in the certificate store
[INFO] Adding certificate letsencrypt-sql.northeurope.cloudapp.azure.com 2017/11/21 9:45:56 PM to store My
[INFO] Installing SSL certificate in server software
[WARN] No script configured.
[INFO] Creating task letsencrypt-win-simple httpsacme-v01.api.letsencrypt.org with Windows Task scheduler at 9am every day.
This is where the Let’s Encrypt magic happens: the app starts a temporary web server that hosts a key file. The Let’s Encrypt server will look for that key file in order to verify the identity of the server (and that it matches the DNS name). Once this “handshake” is done, the client receives a shiny new certificate and installs it in Windows’ certificate store.
The app also places a copy of the certificate in C:\ProgramData\letsencrypt-win-simple, so you can install it manually or copy it to another server.
While you’re at it, give the SQL Server service account full control to this directory as well.
Finally, the app can give the SQL Server service account permissions to the certificate:
Do you want to specify the user the task will run as? (y/n): - yes

Enter the username (Domain\username): letsencrypt-sql\sqlserver

Enter the user's password: **************
If you forget this step, or if you accidentally mistyped the account or password, the app gives you an error message and SQL Server service may not even restart. The certificate is installed and ready to use, though. You can just add the permissions manually:
Manually giving SQL Server permissions to the certificate
- Start Management Console by running mmc.exe.
- Press Ctrl+M to add a snap-in.
- Add the Certificates snap-in.
- Make sure you choose “Computer account” -> Local computer.
Locate your certificate. It will probably be in Personal -> Certificates
- Right-click the certificate -> All tasks -> “Manage private keys…”
- Add the SQL Server service account with “Full control”
Registering the certificate in SQL Server
It’s time to configure the certificate in SQL Server. To do that, you’ll need to open SQL Server Configuration Manager. Expand the node SQL Server Network Configuration, right-click “Protocols for {your SQL instance}” and select “Properties”.
On the “Certificates” tab, you should now be able to select your new certificate.
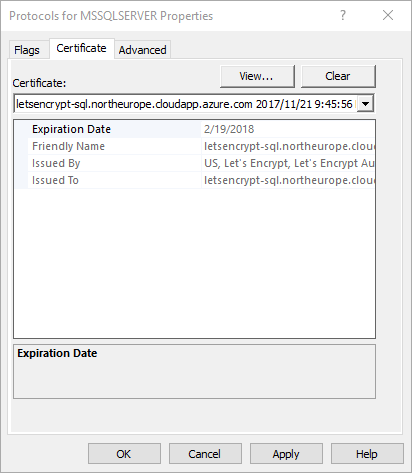
If you can’t see your new certificate, check that the name on the certificate exactly matches the fully qualified name of the server.
You can choose to enable “Force Encryption” on the “Flags” tab if you want. But you should first verify that all clients and apps play nice with encryption so you don’t go and break anything.
Once you’re done and click OK, the Configuration Manager will prompt you to restart the SQL Server service for the new certificate to become active.
Testing encryption
Using Management Studio, try connecting to the instance. Before you click “Connect”, expand the “Options” and check “Encrypt connection”, but leave “Trust server certificate” unchecked.
Now, try connecting to the same server, specifying different host names – try “localhost”, the IP address, just the server name without the domain, and the fully qualified domain name. You’ll notice how you get an error any time you specify a name that wasn’t included in the list of host names on the certificate:
A connection was successfully established with the server, but then
an error occurred during the login process. (provider: SSL Provider,
error: 0 - The target principal name is incorrect.)
Automatically renewing the certificate
Half the work is done. In 90 days, your certificate will expire, and if you’re like me, you’ll want an automated process that renews your certificate before that happens.
Renewing the certificate
The letsencrypt.exe application can automatically renew any certificate about to expire:
letsencrypt.exe --renew
… or you could force the renewal of all certificates:
letsencrypt.exe --forcerenewal
Updating the SQL Server certificate
The renewed certificate will have a new thumbprint, which means we’ll have to update the thumbprint in SQL Server to match. For this purpose, I’ve borrowed, commented and adapted Jan Pieter’s Powershell script:
# This is the SQL Server service account that will need
# permissions on the certificate:
$serviceAccount = "letsencrypt-sql\sqlserver"

# Find the most recent certificate with the correct CN.
# Depending on if you have other certificates installed
# on the machine, you may have to adapt the Where-Object
# clause to isolate the correct one.
$cert = (gci -path cert:/LocalMachine/My | Where-Object {$_.Subject -like "CN=letsencrypt-sql*"} | Sort-Object -property NotAfter -descending | Select-Object -First 1)

# Specify the user, the permissions and the permission type
$permission = "$($serviceAccount)","Read","Allow"
$accessRule = New-Object -TypeName System.Security.AccessControl.FileSystemAccessRule -ArgumentList $permission;

# Location of the machine related keys
$keyPath = $env:ProgramData + "\Microsoft\Crypto\RSA\MachineKeys\";
$keyName = $cert.PrivateKey.CspKeyContainerInfo.UniqueKeyContainerName;
$keyFullPath = $keyPath + $keyName;

try {
 # Get the current ACL of the private key
 $acl = Get-Acl -Path $keyFullPath;

 # Add the new access rule to the ACL of the private key
 $acl.AddAccessRule($accessRule);

 # Write back the new ACL
 Set-Acl -Path $keyFullPath -AclObject $acl;
}
catch
{
 throw $_;
}

# Get thumbprints of old and new certificates.
# IMPORTANT: the registry key will vary with the
# instance name and version of your SQL Server!
$regpath = 'Registry::HKEY_LOCAL_MACHINE\SOFTWARE\Microsoft\Microsoft SQL Server\MSSQL14.MSSQLSERVER\MSSQLServer\SuperSocketNetLib'
$oldthumb = (Get-Itemproperty -Path $regpath).Certificate
$newthumb = $cert.Thumbprint.ToLower()

# If the thumbprint changes (i.e. if the certificate
# has been renewed), update the registry.
if ($oldthumb -ne $newthumb) {
 Set-ItemProperty -Path $regpath -Name 'Certificate' -Value $newthumb

 # An updated certificate unfortunately means that we
 # need to restart the SQL Server service.
 # IMPORTANT: Any running service that depends on
 # SQL Server, like SQL Server Agent, will have to
 # be manually stopped first and restarted after.
 Stop-Service sqlserveragent
 Restart-Service mssqlserver
 Start-Service sqlserveragent
}
Scheduling renewals
With all the coding done, it’s a simple enough task to schedule this to run at a convenient service window, for instance using SQL Server Agent. I’m splitting the work into two steps; renewing the certificate and registering the new certificate in SQL Server.
Renewing
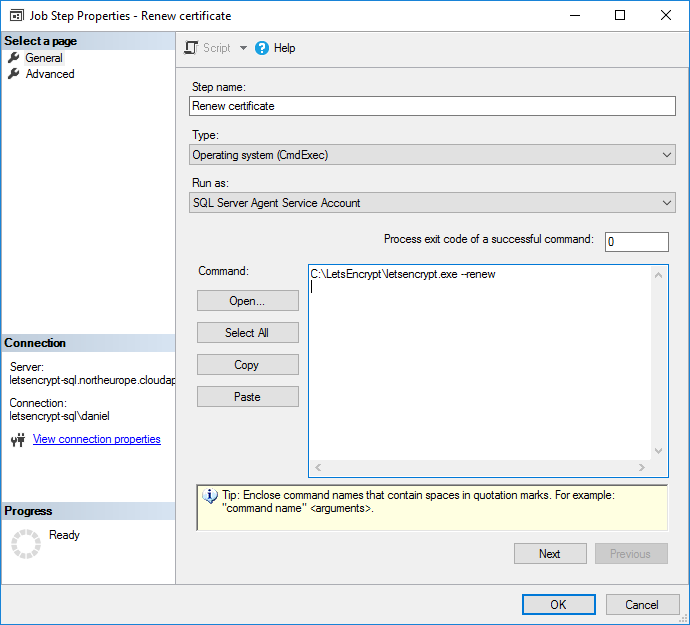
Here’s the command in copy-paste friendly format:
C:\LetsEncrypt\letsencrypt.exe --renew
You should be able to run this command fairly frequently, as it only renews certificates that are due for renewal – no need to schedule the job once every three months, but rather perhaps daily or weekly.
Important: Verify that this step actually works and has sufficient permissions. Even if the app execution fails, the step will indicate success (a green check mark), so you’ll need to look in the job step execution log to be sure.
Remember that this stuff runs in SQL Server Agent’s security context. You may have to tweak some permissions to get this running. I made the service account a local administrator, but this may not be a great idea for a production environment.
Registering
In the second step, I first tried pasting the Powershell script into the command field of the job step, however that failed with a syntax error that I couldn’t re-create in a powershell prompt. It appears to be a better idea to save the script in a script file (extension .ps1) and the use an “Operating system (cmdexec)” type step to run that script with powershell.exe:
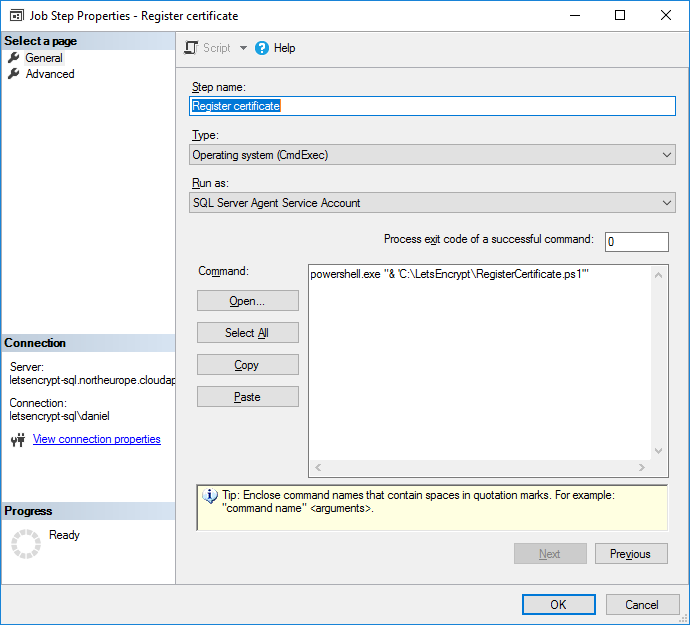
Important: If you need to stop and restart SQL Server Agent (because depends on SQL Server), this will kill your script execution, meaning that SQL Server Agent won’t restart. To work around this, you can execute the script asynchronously using the “start” command (not in the screenshot!).
The exact syntax with quotes and apostrophes (synchronous):
powershell.exe "& 'C:\LetsEncrypt\RegisterCertificate.ps1'"
The same command, asynchronous:
start powershell.exe "& 'C:\LetsEncrypt\RegisterCertificate.ps1'"
Important: The same thing applies to this step as with the first one – it may appear to succeed, but you’ll have to check the job step log manually to be sure! Do this before adding the “start” command, or you may not see any script output at all.
Bottom line
If you have the time and energy, it is actually possible to set up a Let’s Encrypt certificate on your SQL Server. And using SQL Server Agent (or another scheduling software), you can auto-renew your certificates.
It’ll save you some money (perhaps a lot of money if you have many servers), but it involves a bit of work and potentially some maintenance.
If you’re better at Powershell than me, or if you spot a problem, please let me know in the comments and I’ll try to correct/clarify the post!
Fantastic article!
Thank you, Sir!
Encryption protects either a) data at rest (EFS, BitLocker, TDE), b) data in motion (SSL, TLS, IPsec) or c) both (AlwaysEncrypted). So, technically TDE does not protect “connections” but protects against a stolen data file, log file when the thief does not have the appropriate recovery keys. But I definitely learned from the article!
You’re quite correct. But I don’t think there’s any mention of TDE in the post, but rather TDS, which is the protocol used to communicate between SQL Server and its clients.
Thanks for reading!
I can’t help but see the irony in requiring unencrypted Port 80 connections, to setup a secure TDS connection!
Is there an alternative to opening up Port 80 to *all* external IPs? Because this seems like a really bad idea.
Hah, yeah, I see what you mean. But port 80 is open for a few seconds while the key request is happening, and it’s only listening for a very specific key request. This is how the Let’s Encrypt key request/renewal process works. I’m sure there are people a lot smarter than me who’ve thought about the security aspects of this.
The letsencrypt.exe utility provides a number of options for requesting keys (see the documentation on Github). I just didn’t want to elaborate on them all in my blog post. 🙂
Thanks for reading!
To specifically answer your questions, I’m guessing Let’s Encrypt have a number of CA servers, so to my knowledge it’s probably not a feasible idea to isolate specific IPs in a firewall/network security group.