What this is
This is a checklist I’ve worked out for installing SQL Server 2019 on Windows. I would love to hear about your recommendations and best practices in the comments! This list also exists for SQL Server 2014, SQL Server 2016, SQL Server 2017 and SQL Server 2022. Starting with 2017, SQL Server can also be set up in Linux containers.
Hardware
This checklist assumes that all your hardware is in place and tested. As a consultant, I’m typically provided with a fresh server (VM or physical) with a clean install of Windows Server and the basic networking, domain, storage, etc installed and nothing more.
To keep this checklist accurate, I’m going to stay firmly in my comfort zone and leave SAN performance, RAID configuration, NIC teaming and load testing to other professionals.
- Anthony Nocentino has a very thorough post on best practices for setting up virtual machines for SQL Server.
- Glenn Berry goes through some recommended CPUs for SQL Server on sqlskills.com
- MS Technet has a breakdown of different RAID levels
Windows Server prerequisites
I’m using Windows Server 2019 for the examples and screenshots, but I think most of this will work on Windows Server 2012/2012R2 or 2016 as well.
SQL Server 2019 requires the .NET Framework 4.6.1
Windows Server 2016 and newer comes pre-installed with this version of the .NET Framework, but you may have to install it on older Windows Server versions.
Formatting disks
- Use separate disks for database files, transaction log files, backups and tempdb. How many drives you use will depend on how deep pockets you have. Ideally, place the following on one or multiple volumes each:
- Database files
- Database transaction logs
- Tempdb files
- Tempdb transaction logs
- Backup files
- Possibly a separate volume for the SQL Server program files
- Partition your volumes with GPT rather than MBR if you can.
- Format all data/log drives using 64 KB block sizes, as this aligns with the I/O operations of SQL Server.
- Name your drives in a sensible manner, like DATA1, DATA2, DATA3, … LOG1, LOG2, … TEMPDB1, TEMPDB2, …, BACKUP, etc.
The block size of your data & log drive is important, not only for performance. It also limits the maximum formatted size of your volume, which could prevent you from growing the volume at a future date. You can check the formatted block size with this PowerShell command:
Get-Volume | Format-Table DriveLetter, FileSystemLabel, AllocationUnitSize
Anti-virus software
I don’t like anti-virus software, and if it doesn’t crash things, chances are that it’ll come with a measurable performance impact. If you still want an antivirus software, make sure that it excludes:
- *.mdf, *.ndf and *.ldf
- *.bak and *.trn
- *.log and *.txt
On Azure virtual machines
- If you’re using SSD drives, the data drives should have read caching.
- Disable caching on transaction log drives.
- Microsoft recommends enabling TRIM for unmanaged standard disks.
- More on SQL Server performance on Azure VMs.
- Even more reading on setting up Azure VM storage.
Installing
With the prerequisites out of the way, here we go:
- The first few steps are pretty much self-explanatory.
- Here, we get to choose the features to install.
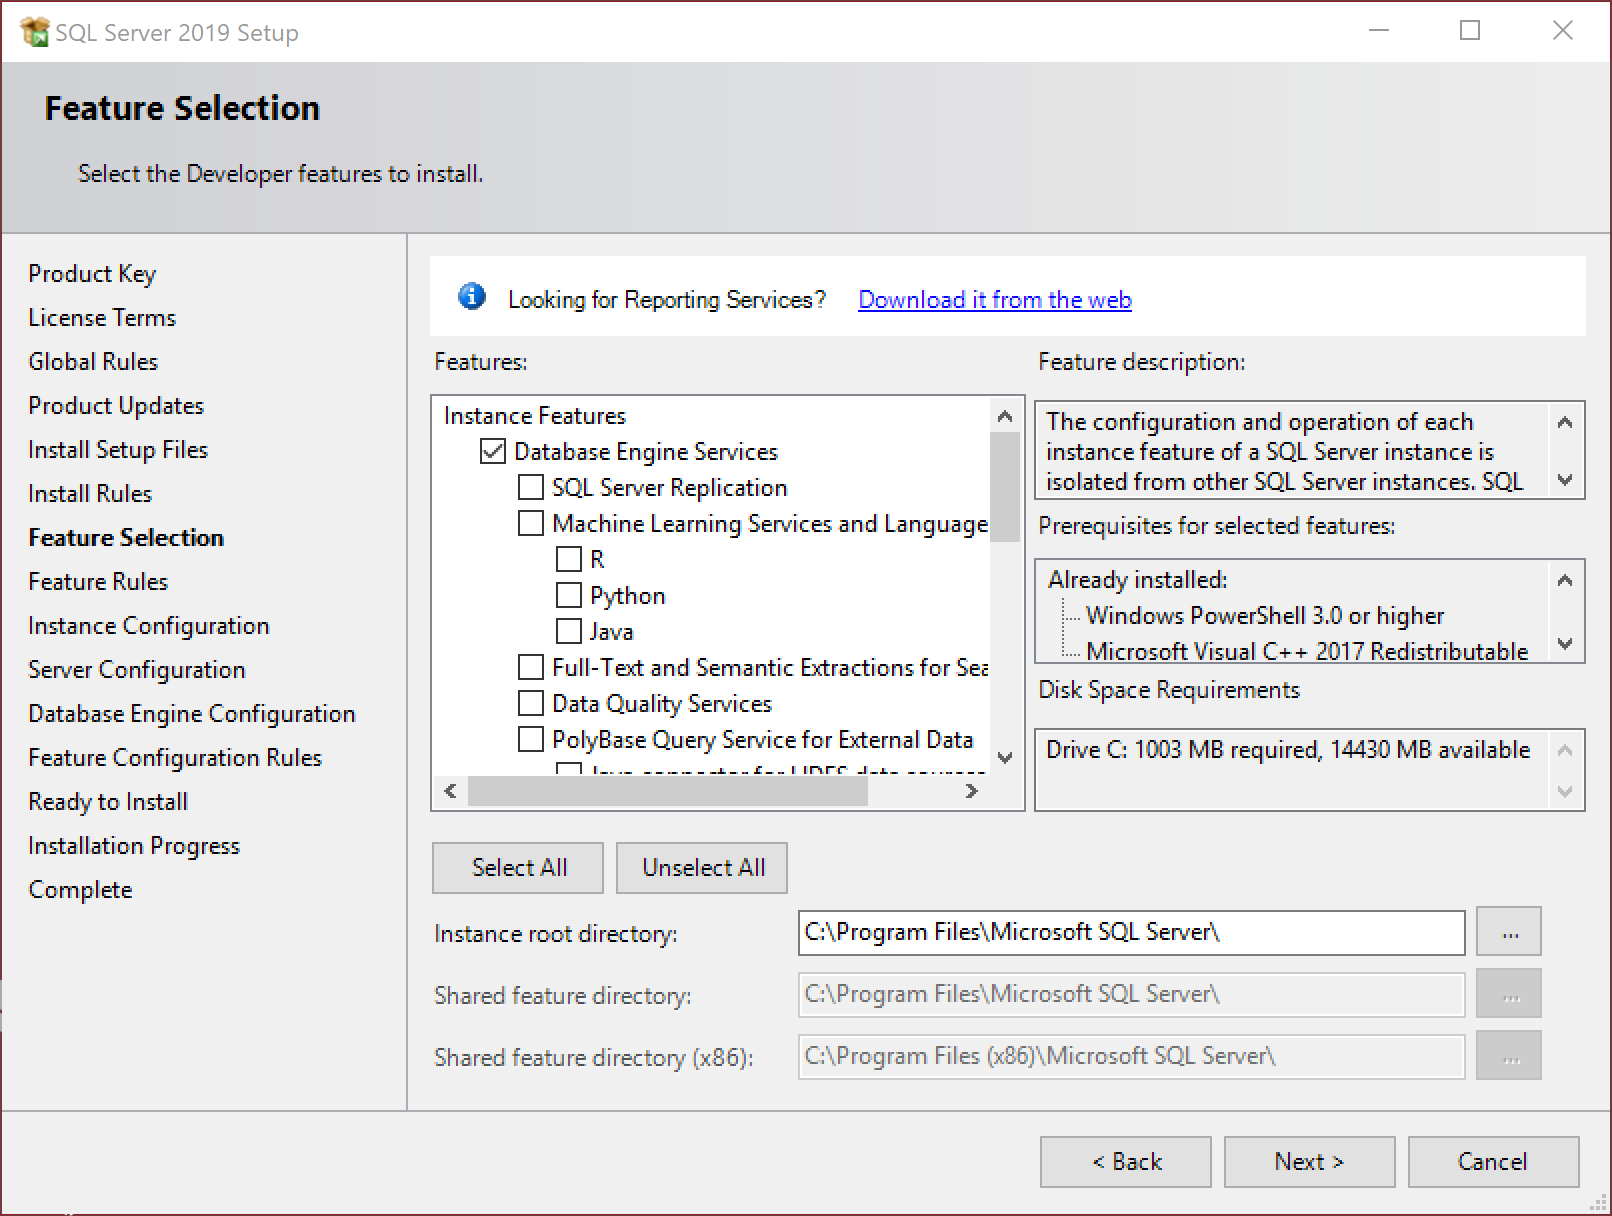
- Note that the management tools are installed separately and not as a part of the SQL Server distribution. We’ll get to those further down.
- Also, note the installation path, which by default is on the system drive.
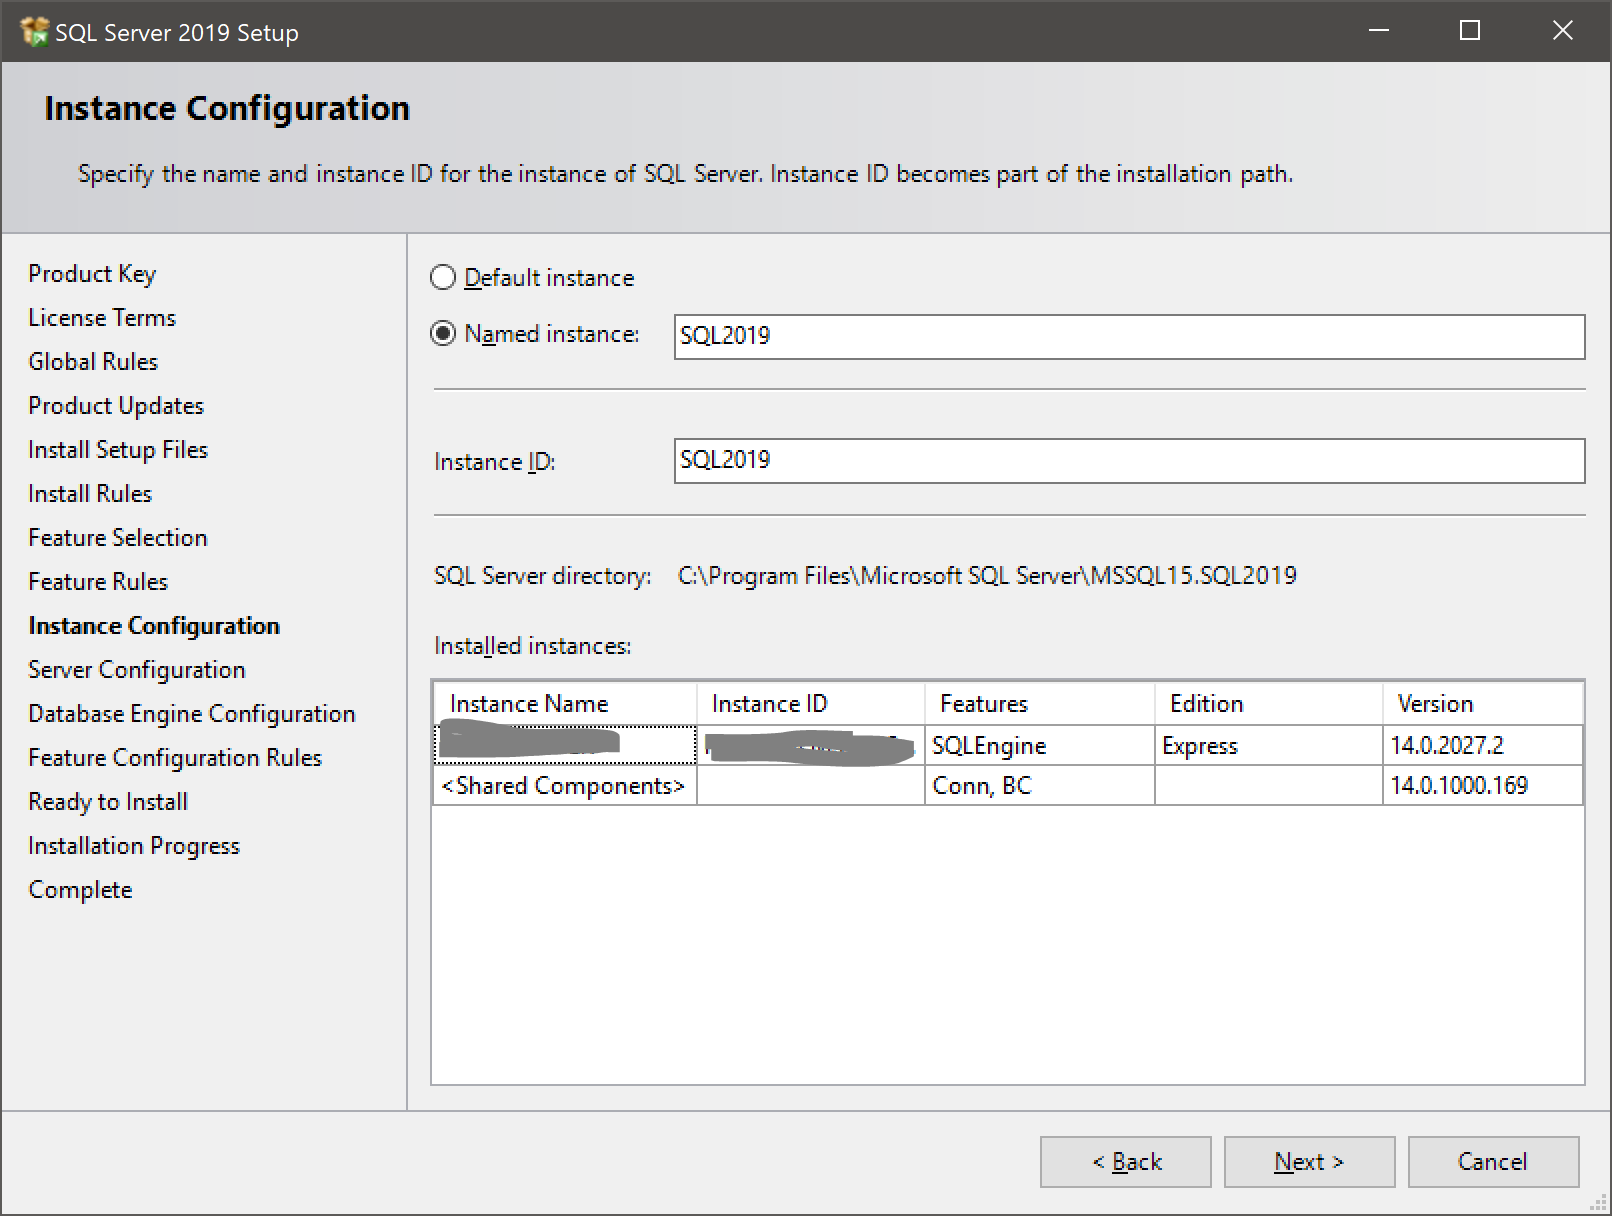
- On the next page, “Default instance” means you can connect to the server by just using the server name. “Named instance” means you connect to server_nameinstance_name. If you’re using multiple instances on the same server, you’ll want to use named instances for all of them. Named instances are also a good way to know which server is dev, test or production.
- Here, you’ll choose the security accounts used to run each of the services, as well as which services are enabled/disabled and if they start automatically with your server. Microsoft recommends that you use a separate account for each service.
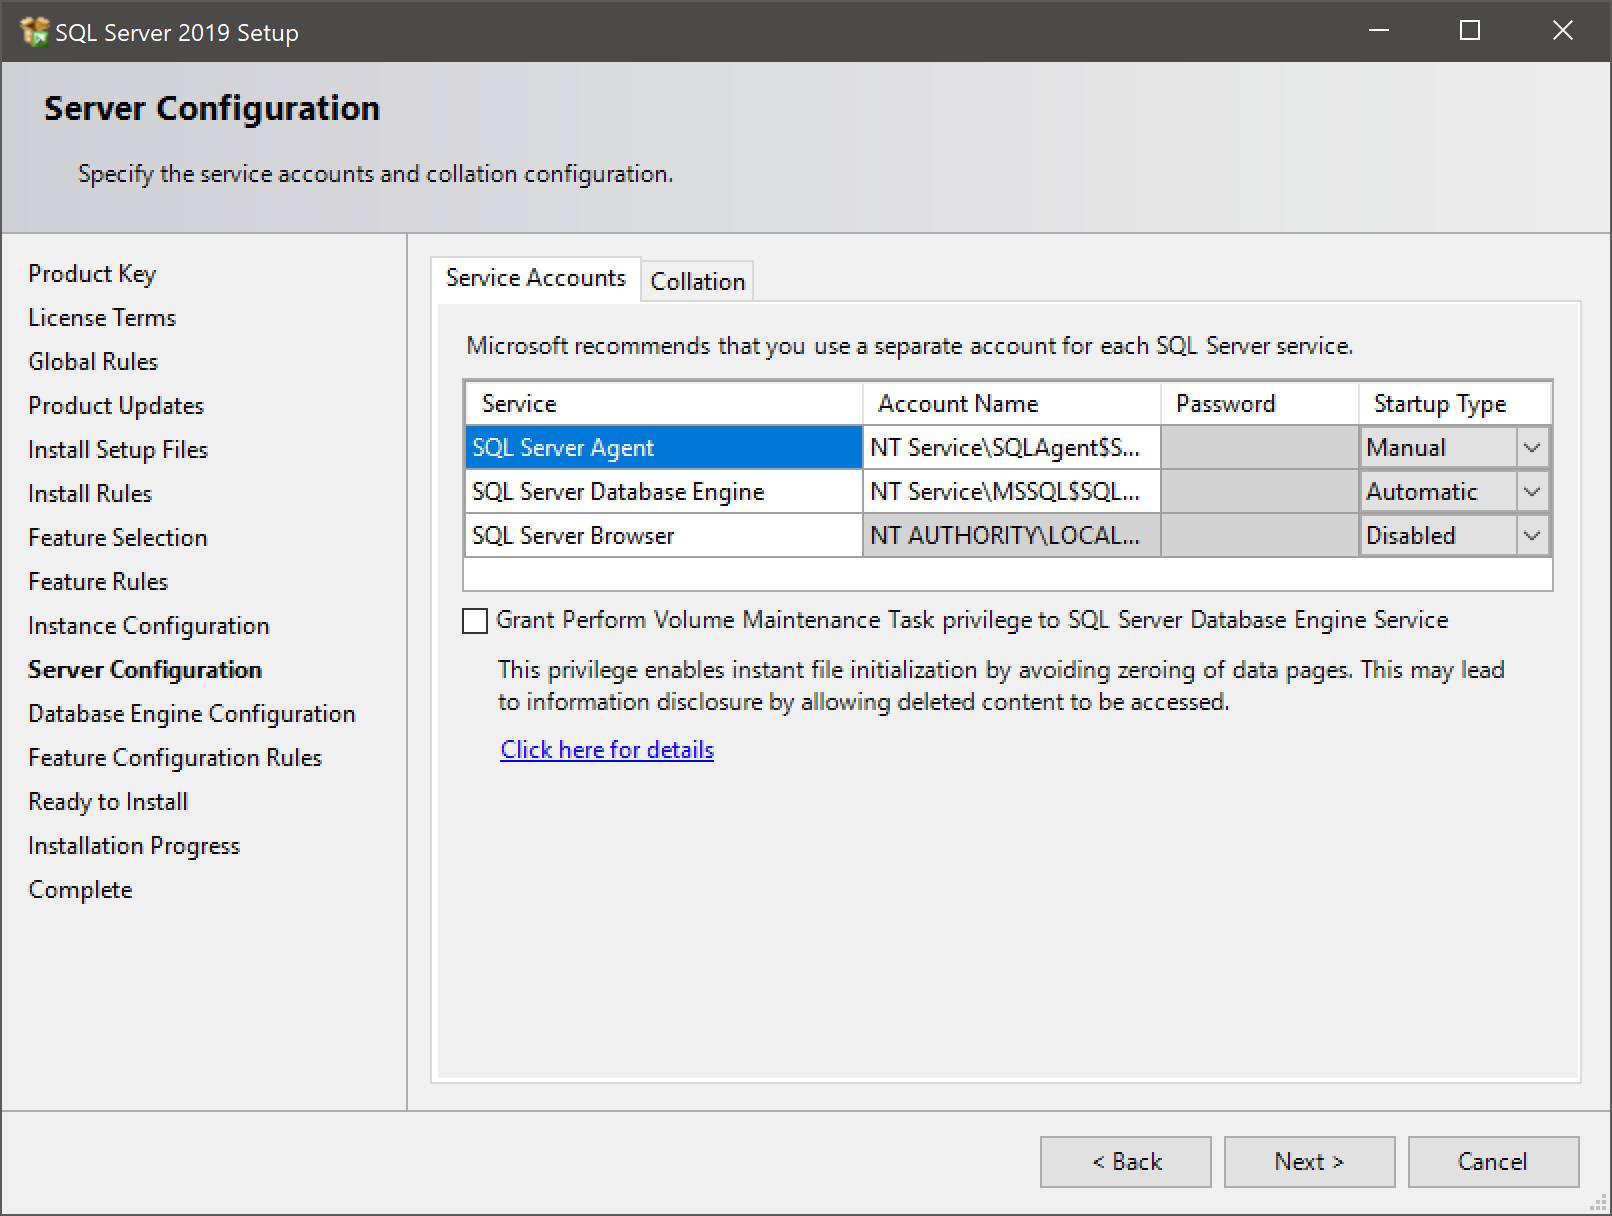
- Warning: Don’t use an account with administrative permissions as a service account!
- Local system accounts (NT Service, NT Authority, etc) don’t have access to your network, which can become a problem if, for instance, you need to backup to a network share.
- Set the SQL Server Browser to Automatic startup if you have multiple instances on the server.
- Check the “Grant Perform Volume Maintenance Task privilege” checkbox to enable instant file initialization. Warning: Be careful with this setting if your storage uses thin provisioning.
- Make sure SQL Server Agent starts automatically if you want to run scheduled jobs.
- Don’t click Next until you’ve checked the Collation tab:
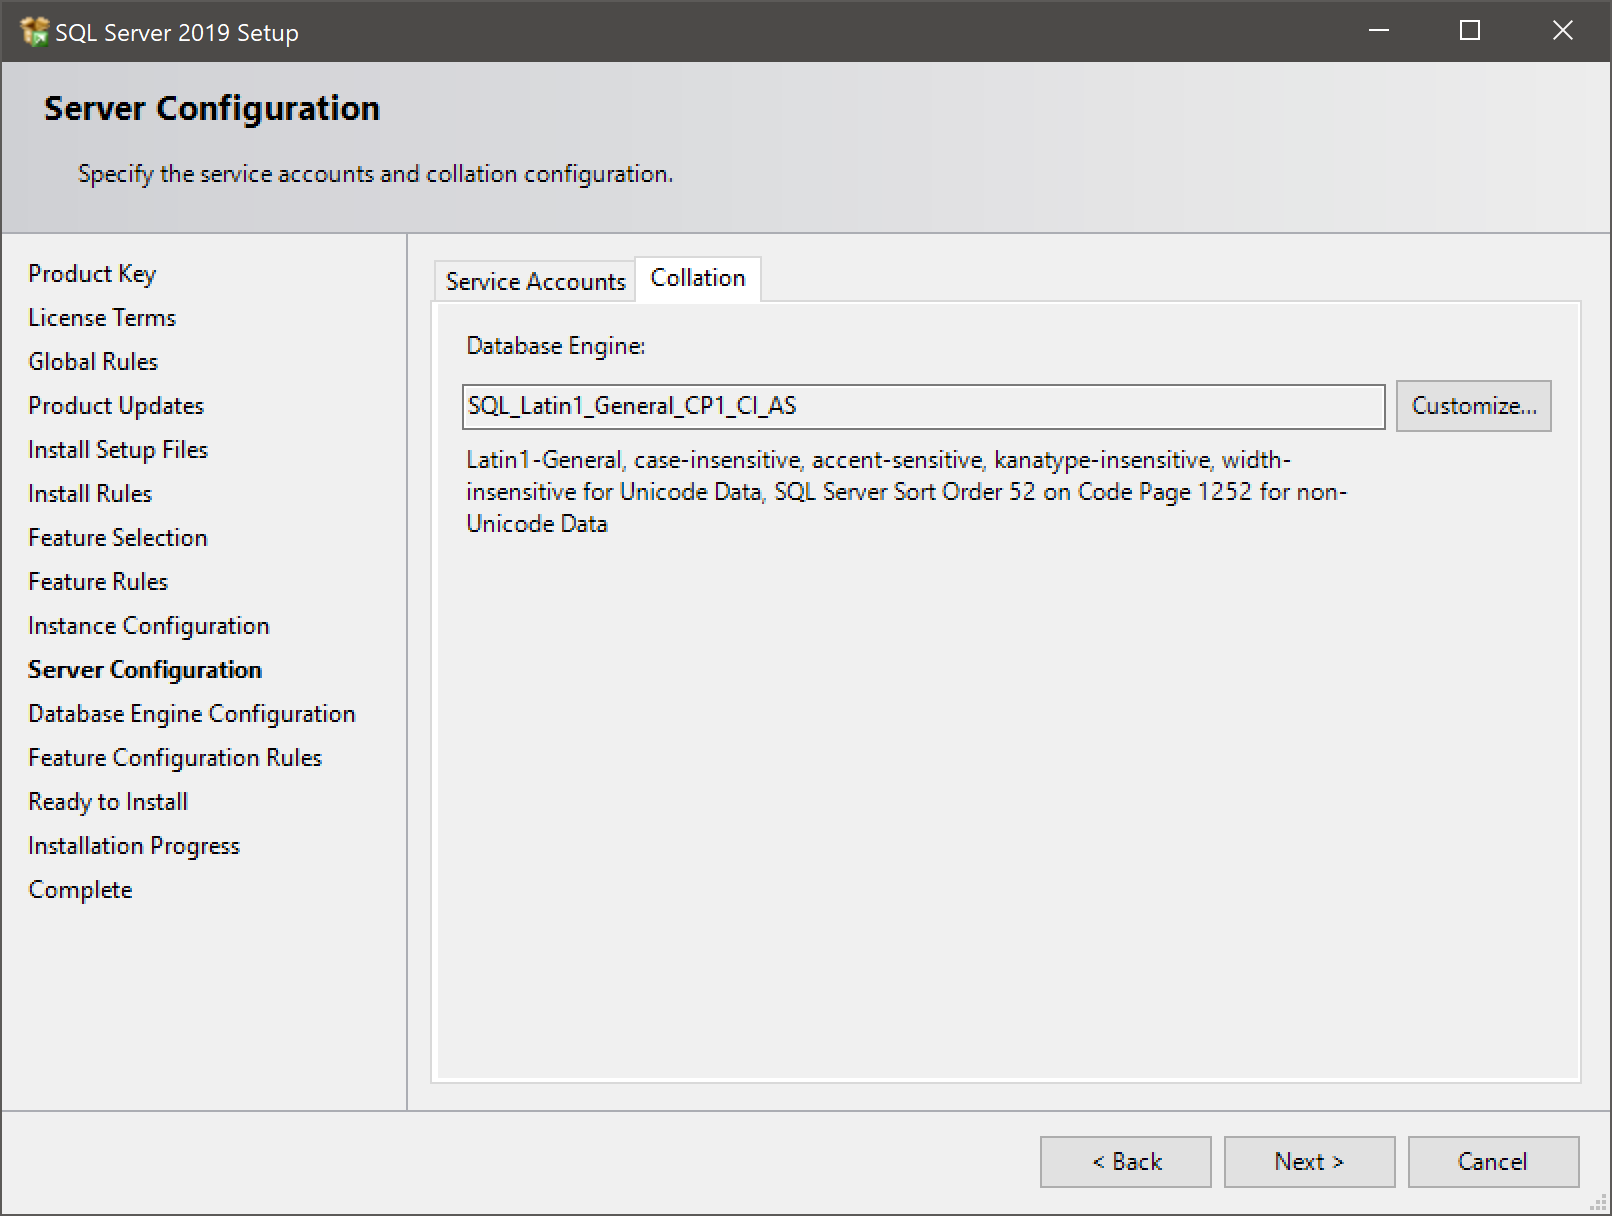
- The server collation is applied to the tempdb, master, model and msdb databases. If you’re moving legacy solutions to this server, a difference in collation could crash that code, particularly if the code uses temp tables.
- Then, choose if you want to log on using just Windows authentication or with “mixed mode”.
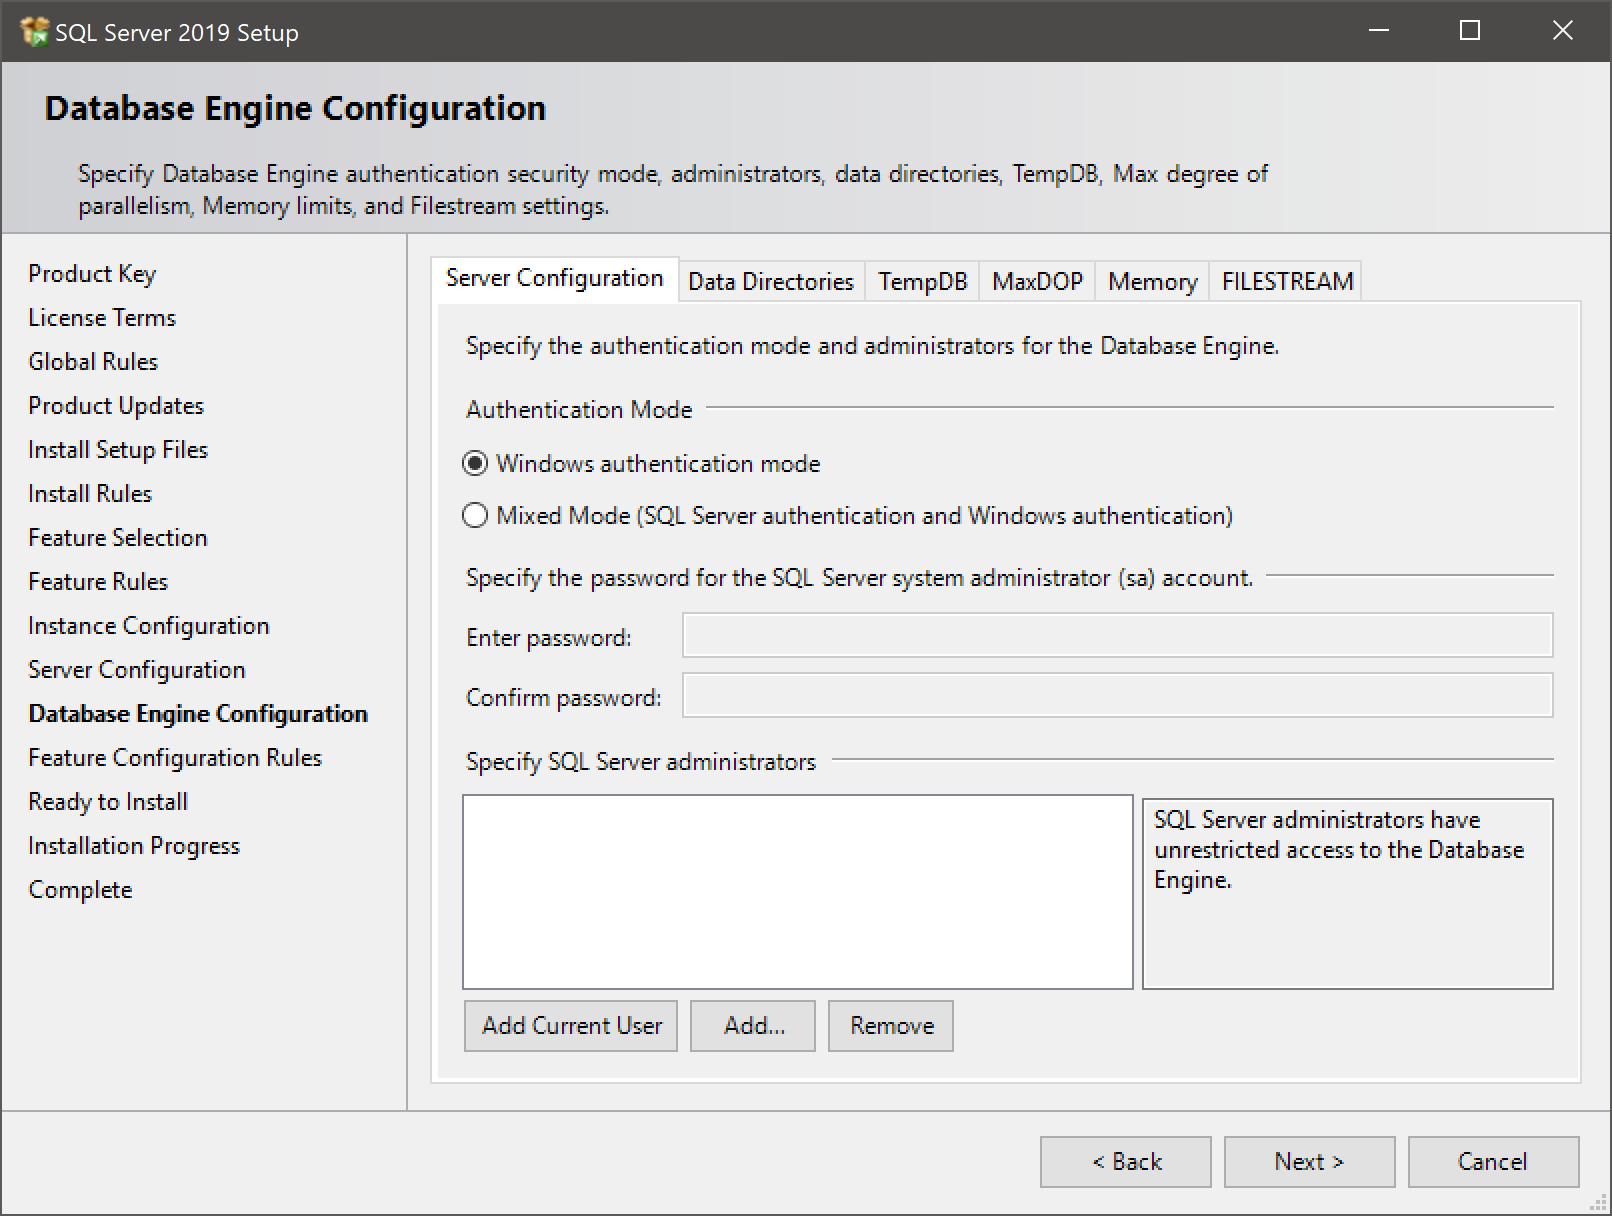
- Why Windows authentication? No sa password floating around, no unaccounted-for accounts without clear owners.
- Why mixed mode? Kerberos authentication problems are messy, particularly across domains/networks. Some applications do not support Windows authentication.
- If you want to use the “sa” account, you’ll need Mixed Mode.
- Remember to add any Windows accounts or groups as sysadmin before you move on, or you could be locked out from your own server.
- Before clicking Next, review the Data directories tab:
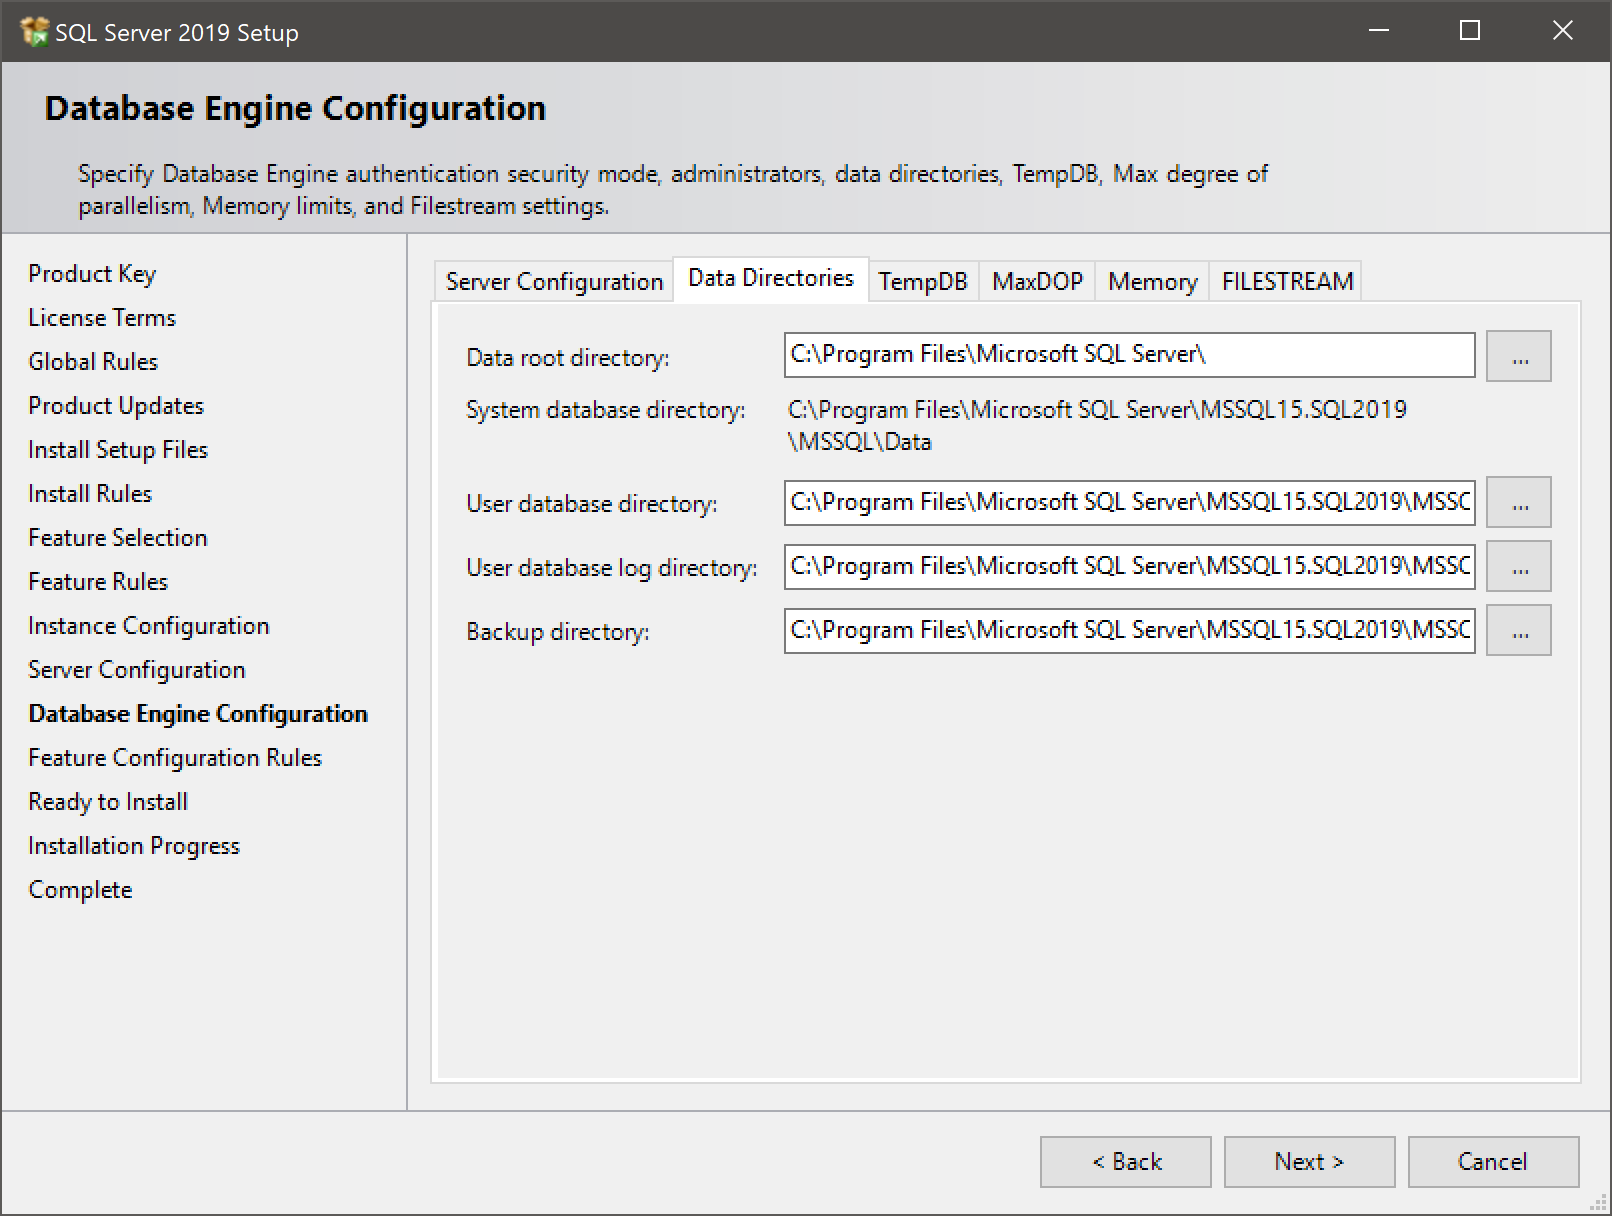
- Warning: don’t put database files, logs, backups, etc in a root directory. Funky permission things happen there.
- Warning: don’t let multiple instances share data directories unless you know exactly what you’re doing! The installer will overwrite the folder permissions. Ask me why I know this.
- On the next tab, configure the tempdb files:
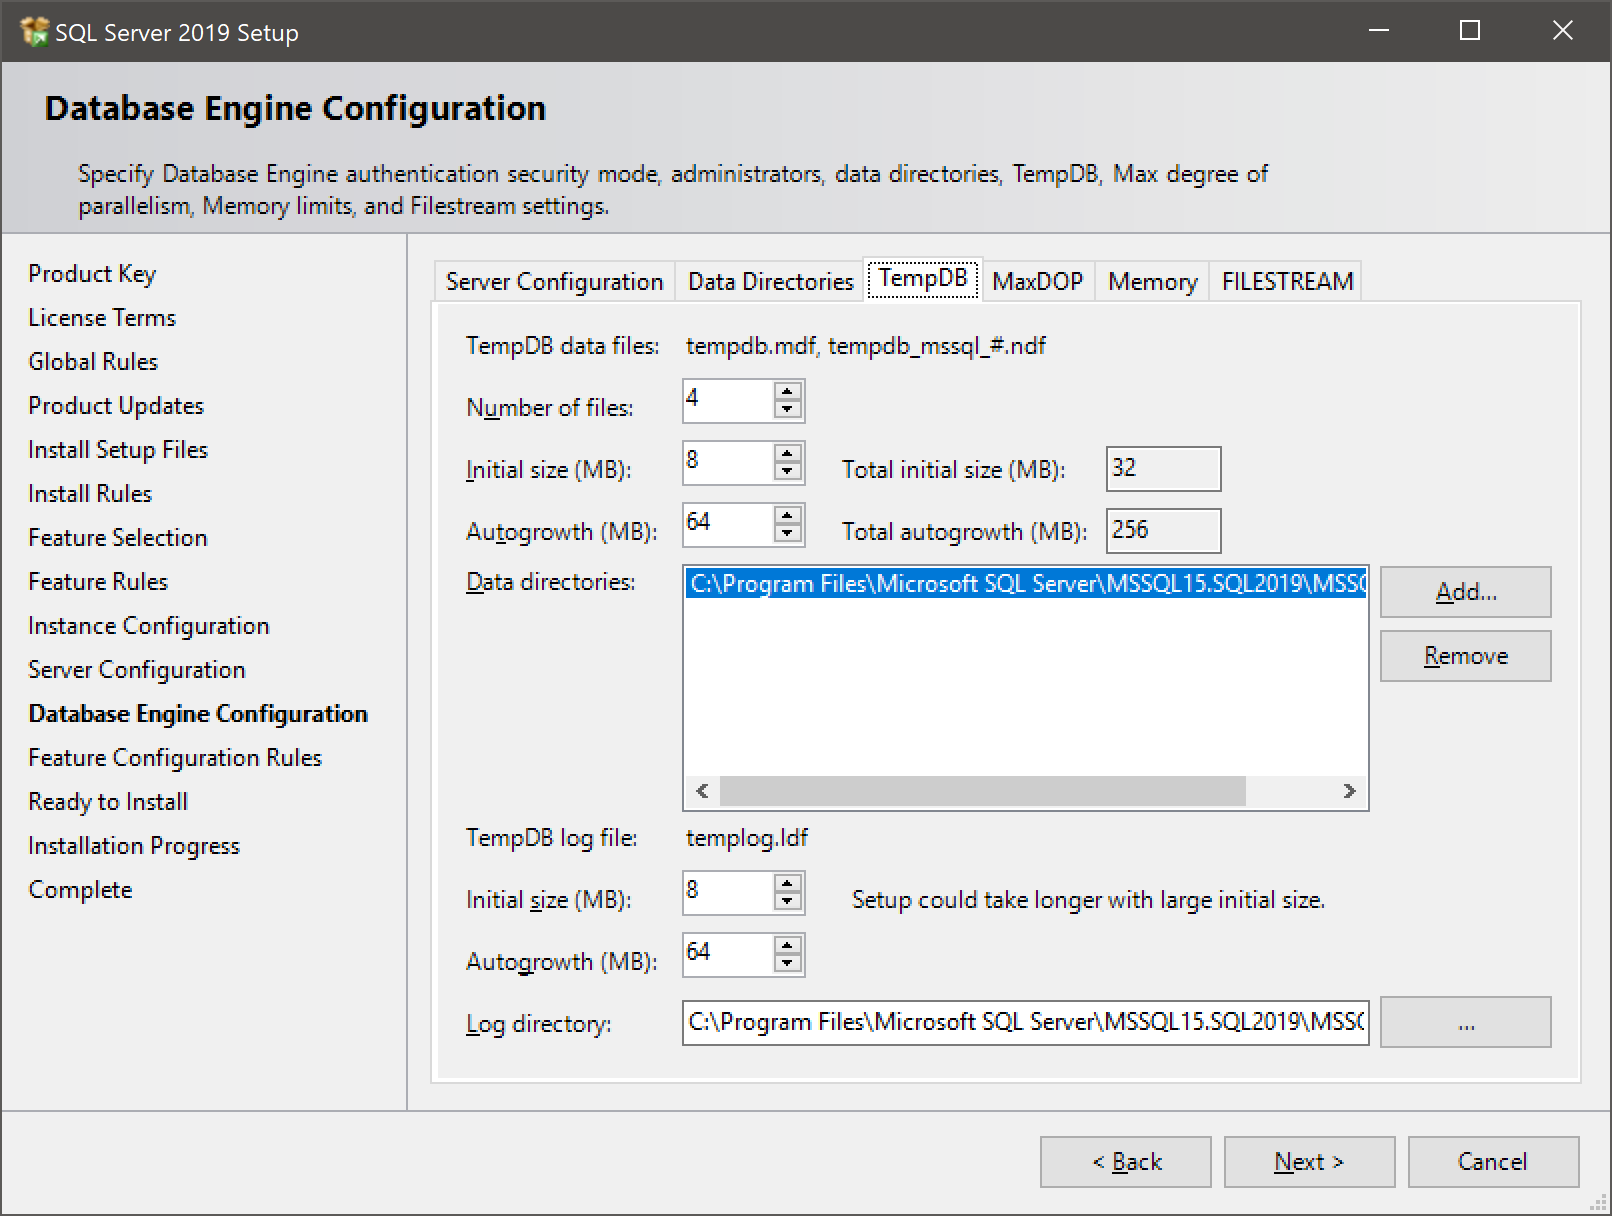
- As a rule of thumb, add as many tempdb data files as your number of logical processors, up to 8. You can add multiple drives (data directories) if you want to spread tempdb across several volumes. The default size of the data and log files are on the tiny side, so scale them up to what you think you’ll need, and also make sure the autogrowth setting is large enough that it won’t be happening all the time.
- Depending on your environment, it may be a good idea to size the tempdb files to their “correct” size and disable autogrow entirely.
- Warning: As with the user databases, don’t place files in a root directory. On Azure VMs, it may be a good idea to place tempdb on the local SSD drive for performance reasons, but remember that you’ll
- need a script that grants permissions on the SSD on server boot so SQL Server can create tempdb there, or
- grant the SQL Server service account local admin permissions, which is a security risk in and of itself.
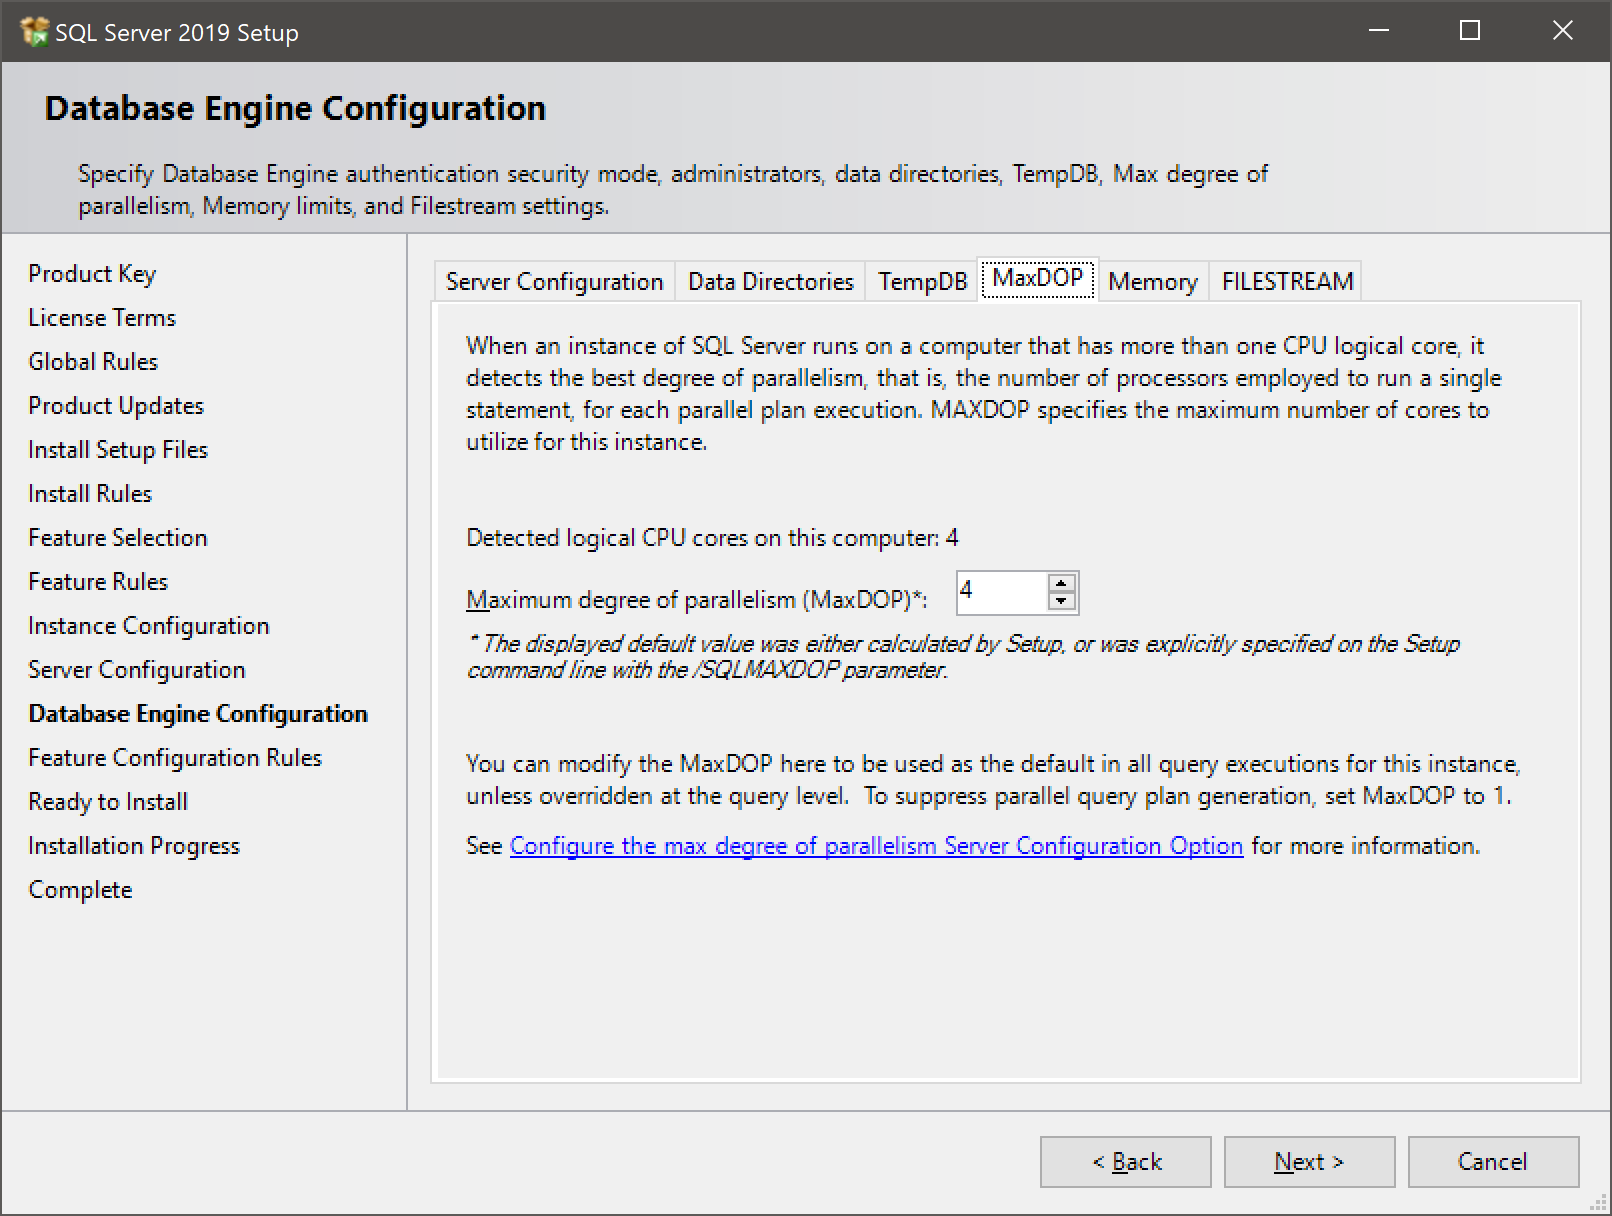
- On the next tab, we’re configuring the MaxDOP (maximum degree of parallelism) setting, which controls how many cores a given query can make use of. The ideal value of this varies with your workload and server hardware, but as a rule of thumb, on OLTP systems you’ll want this relatively low and with long-running workloads like ETL or analytics, you’ll want a higher number.
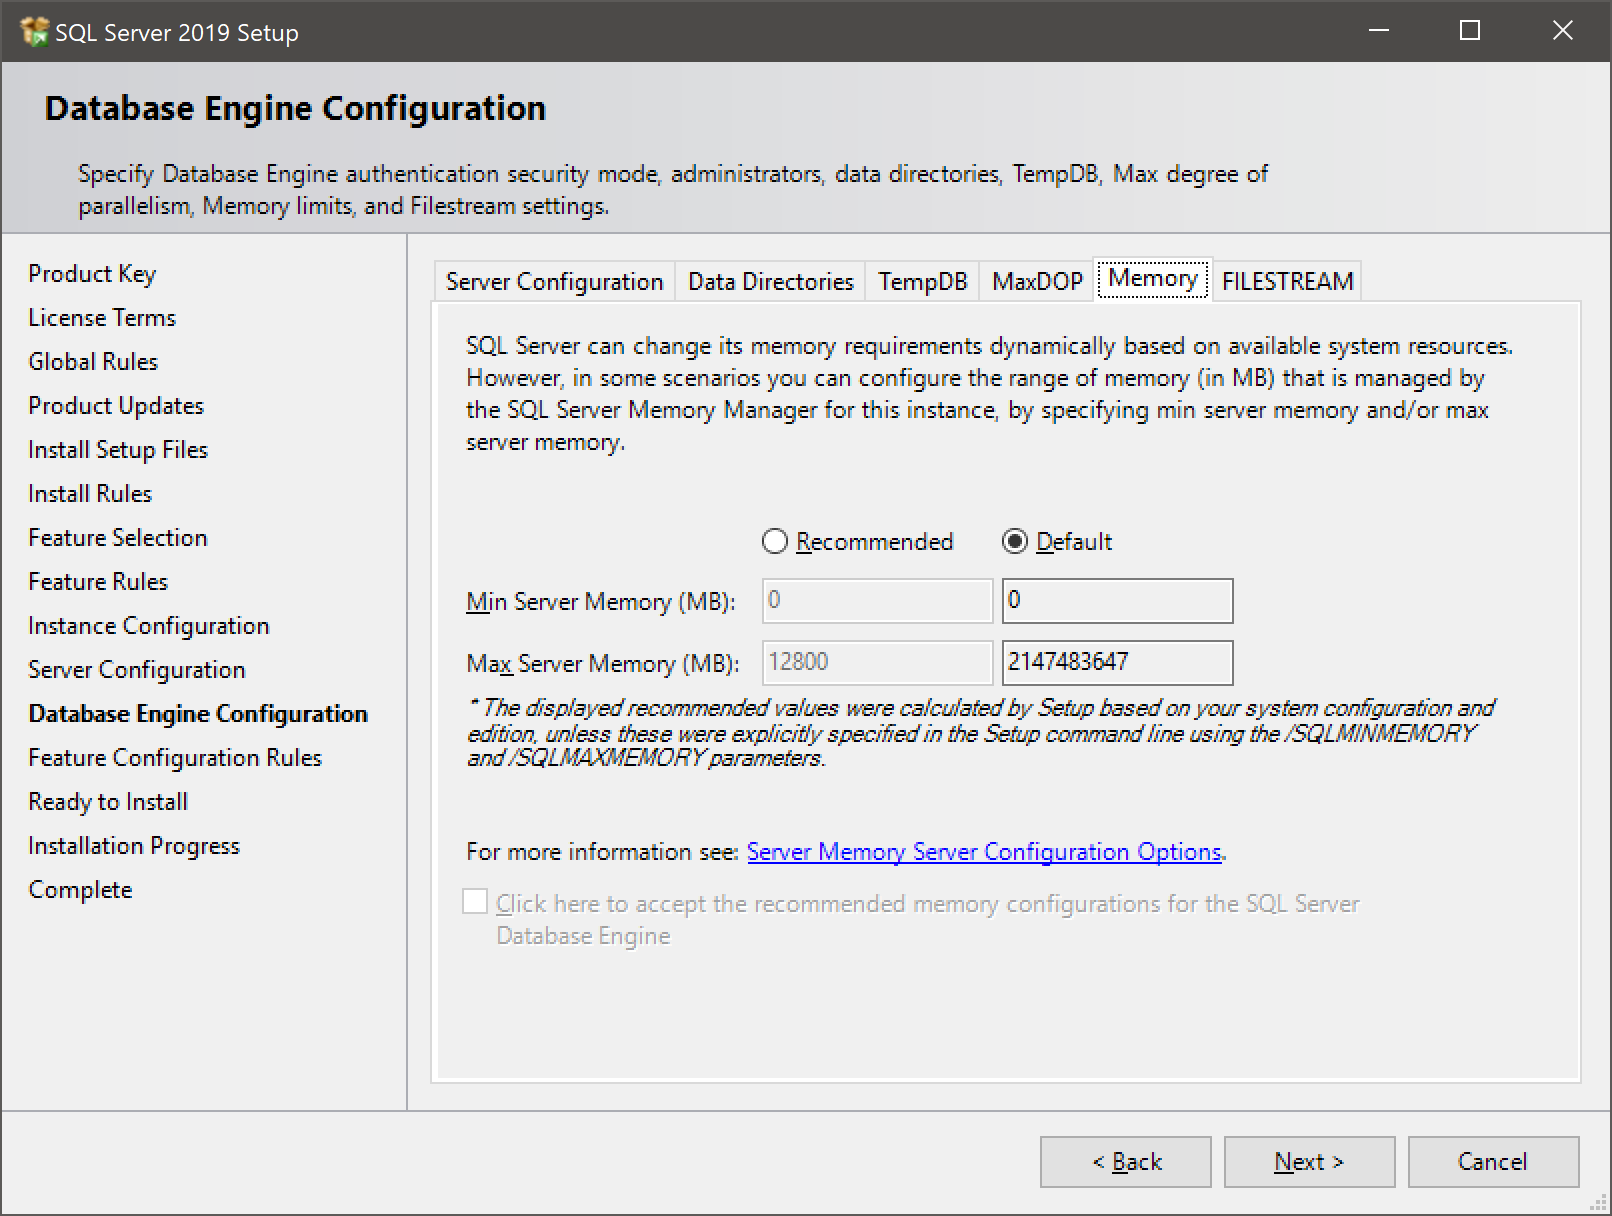
- Finally, we’ll configure the server memory. There’s a more detailed discussion on memory configuration later in this guide, but the installer will provide a recommendation for you.
- After this, if all is well, you can just click “Install” and wait for the magic to happen.
Lock pages in memory
You can choose to enable the “Lock pages in memory” option. When enabled for the SQL Server service account, SQL Server will bypass Windows memory management, in the sense that it will not let Windows flush pages from RAM to disk. This may be a good choice if you’re running multiple applications on the same OS.
- In the Local Policy Editor, find Computer Configuration and Windows Settings, then Security Settings, Local Policies and User Rights Assignments.
- Double-click the item “Lock pages in memory”
- Add the service account used for the SQL Server service to the list of users.
Optional: install Management Studio
Depending on your requirements, you may or may not want to install SQL Server Management Studio on the server. Up to SQL Server 2014, SSMS was included as an install option, but as of 2016, SQL Server and the SSMS are two different products with different release cycles.
- Why? You might want to perform some administrative tasks locally because firewall rules or other reasons prevent you from connecting remotely.
- Why not? Any interactive login takes up precious memory on the server, and Visual Studio/SSMS is no exception. Teach other users and administrators not to work locally.
You can download the most recent SSMS installer here.
Configuration
Network configuration: enable TCP/IP
If you want to connect from another server, you’ll want to enable the TCP/IP protocol. Open “SQL Server Configuration Manager”, open “Network configuration” and view the protocols for your new SQL Server instance.
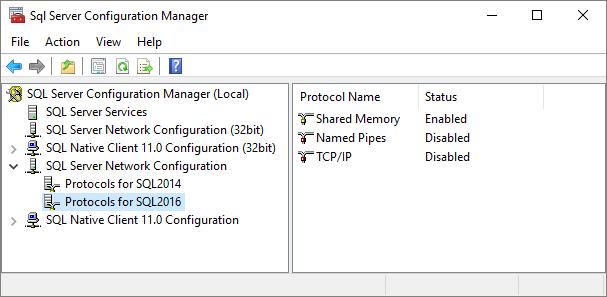
Right-click the “TCP/IP” protocol and select “Enable”. On servers with multiple instances, you should also enable the SQL Server Browser service in the Services control panel and configure fixed port numbers on each SQL Server instance.
Firewall rules: allow inbound connections
You’ll need to allow SQL Server traffic in through the Windows firewall. In the Windows Firewall control panel, add a new rule for a specific program file:

- Add the sqlservr.exe in the Binn directory of the SQL Server installation folder and allow all inbound connections.
- If you’re running SQL Server Browser, also add a (separate) rule that allows inbound connections to sqlbrowser.exe.
You can always find the exact path to a executable file in the Services control panel. Double-click the service and look for “Path to executable”.
For other firewalls (don’t forget the Network Security Group if you’re running on an Azure virtual machine), here are the ports you need to allow inbound traffic on:
- SQL Server: tcp 1433 (applies to the default instance – if you have multiple instances, you’ll have to manually set up port numbers in “SQL Server Configuration Manager”)
- SQL Server dedicated admin connection: tcp 1434
- SQL Server Browser: udp 1434
- SQL Server message broker: tcp 4022
- Used for mirroring: tcp 7022
- Used by the debugger: tcp 135 (Warning: also used by Windows networking, this could have security implications)
Size the tempdb files
If you didn’t already set up your tempdb files in the installer, this is a good time to do so. This is best done using the graphical tools in Management Studio. Open the server, Databases -> System databases, right-click tempdb and go to the “Files” tab:
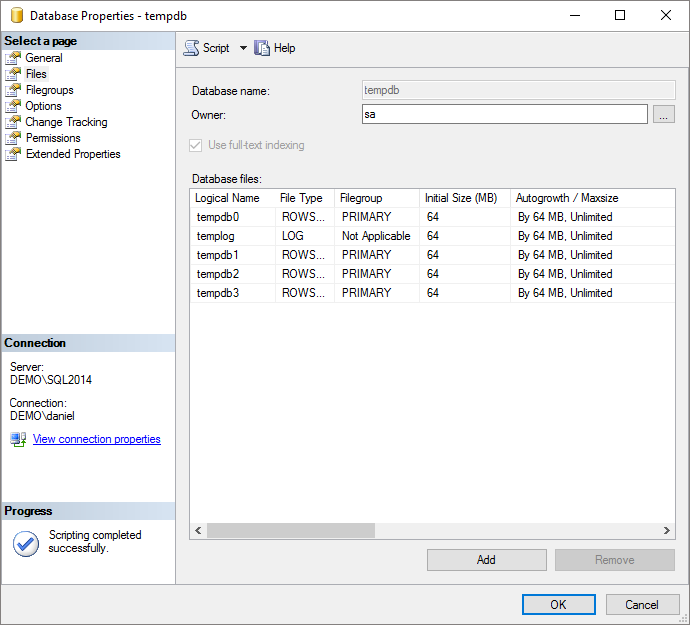
- As a rule of thumb, add as many tempdb data files as your number of logical processors, up to 8. You can add multiple drives (data directories) if you want to spread tempdb across several volumes. The default size of the data and log files are on the tiny side, so scale them up to what you think you’ll need, and also make sure the autogrowth setting is large enough that it won’t be happening all the time.
- Depending on your environment, it may be a good idea to size the tempdb files to their “correct” size and disable autogrow entirely.
In T-SQL, here are some common commands:
--- Add a file:
ALTER DATABASE tempdb
    ADD FILE (NAME='tempdb1', FILENAME='X:......MSSQLDATAtempdb1.ndf',
              SIZE=65536KB, FILEGROWTH=65536KB);

--- Alter size and growth:
ALTER DATABASE tempdb
    MODIFY FILE (NAME='tempdb1',
                 SIZE=65536KB, FILEGROWTH=65536KB);

--- Move a file to another directory:
ALTER DATABASE tempdb
    MODIFY FILE (NAME='tempdb1',
                 FILENAME='Y:......tempdb1.mdf');
Warning: never grow files in percentages, always in fixed, relatively large sizes.
Oh, and if you are slightly compulsive like me, you may want to rename one or more logical file names. Here’s how:
ALTER DATABASE tempdb
    MODIFY FILE (NAME='tempdev', NEWNAME='tempdb0');
Tempdb is recreated every time you restart the SQL Server instance. This also applies when you’re moving tempdb files.
Azure: putting tempdb on the non-persistent SSD
In most cases, you’ll want to place tempdb on the non-persistent SSD drive that comes with your Azure virtual machine (usually the D: drive). However, you’ll either have to put the files in the root of the file system, but that requires the SQL Server service account to have administrative permissions, in and of itself not a brilliant idea, or you’ll have to create a directory to hold the files before the SQL Server service starts up.
Here’s how to set this up. Jim Donahoe had a blog post on the subject, but that blog has since gone away.
The model database
There’s a system database called “model” which acts as a template whenever you create a new database. So while you’re here, check the database settings, file sizes, autogrowth, recovery model, etc for the model database.
Server settings
Right-click the server in SSMS and select “Properties”.
- On the memory tab, set the maximum server memory so that you always have at least 4 GB or 10% of the available memory to the operating system, whichever is larger. This assumes you’re not running other servers, like SSAS, SSRS, SSIS or other SQL Server instances on the server.
- On the “Database settings” tab, enable backup compression.
Parallelism configuration
You may want to configure the maximum degree of parallelism and the threshold for parallelism. The best practice for maximum degree of parallelism varies with workload and is the subject of much debate on the Internets. As a rule of thumb, for many small queries (like OLTP applications), you’ll want a lower number, for fewer and larger queries (like datawarehousing applications), raise this value. Either way, you’ll probably not want to exceed the number of cores you have in each NUMA node, and probably no more than 8.
Here’s how to set the maximum degree of parallelism:
EXECUTE sys.sp_configure 'show advanced options', 1;
RECONFIGURE;

EXECUTE sys.sp_configure 'max degree of parallelism', 4;
RECONFIGURE;
The threshold is “how expensive” a query needs to be in order for the server to consider a parallel plan. The default value of 5 is an ancient legacy and should be increased to somewhere like 50. Again, the exact number is a matter of workload and trial-and-error. Here’s how to change it:
EXECUTE sys.sp_configure 'cost threshold for parallelism', 50;
RECONFIGURE;
Add-ons and nice-to-haves
Add stored credentials
You can add stored credentials to the SQL Server service account so SQL Server can natively backup directly to a network share. You don’t need this if you’re using a domain account for the service and network share.
Backup and maintenance
You’ll probably want to set up a solution to run backup and maintenance on your databases. There are a bunch of different solutions out there. I personally like Ola Hallengren’s kit.
Trace flags
Trace flags are feature switches, some documented, some undocumented (and unsupported), to alter specific behaviours in SQL Server. Konstantin Taranov has compiled a huge list of all known trace flags, including a list of recommended ones.
Automatically disconnect abandoned RDP sessions
Logging on interactively (like with remote desktop) can use up several gigabytes of precious memory on your server. In my experience a lot of people are lazy when it comes to logging out and just close the RDP client instead, leaving an abandoned session on the server. You can have the server automatically log off abandoned sessions with a group policy setting.
- Why? Save server memory by killing abandoned sessions. Discourage RDP logins.
- Why not? Some of those sessions could actually contain unsaved work.
The path is Administrative templates -> Windows components -> Remote Desktop Services -> Remote Desktop Session Session Host -> Session Time Limits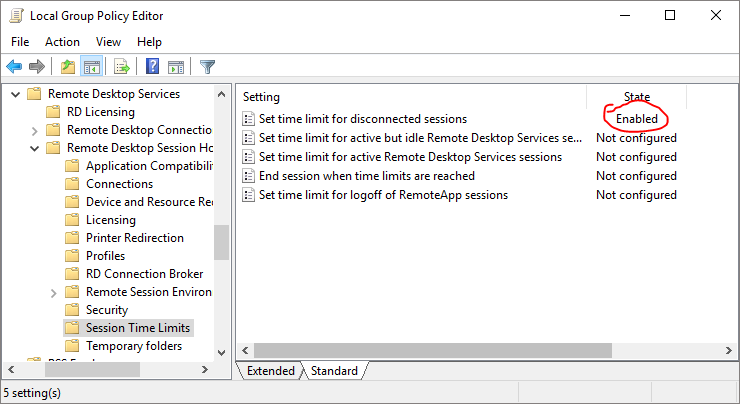
I personally tend to leave enough time for someone to go to lunch while a Service pack is installing, but no more.
Check for updates
SQL Server is frequently updated by means of Service packs (SP) and Cumulative updates (CU). sqlserverupdates.com keeps track of them, and even includes an e-mail subscription service. Note that SQL Server 2017 and 2019 will only receive CUs, no formal service packs.
Tools and hacks
There are loads of SQL Server utilities out there.
- Brent Ozar’s first responder kit includes sp_Blitz and other tools
- Adam Machanic’s sp_whoisactive is popular among DBAs as a replacement to sp_who2.
- For development servers, you may want to check out my sp_ctrl3 utility.